Body Map Field Type
The body map field lets carers and coordinators document physical observations — wounds, bruises, pressure areas, and other skin integrity findings — by tapping directly on a front-and-back human silhouette diagram. Each marker is colour-coded, numbered, and paired with type, severity, and description details.
Teiro's body map field gives your team a structured, visual way to document physical observations — wounds, bruises, pressure areas, rashes, and other skin integrity findings — directly on a human silhouette diagram. No freehand drawings, no ambiguous written descriptions. Just tap the body, choose a type and severity, and the record is done.
This article explains what the body map field looks like, when to use it, how to add it to a form, and what the captured data looks like.
---
What is the body map field?
The body map field renders a front-and-back human silhouette diagram inside a form. When a carer or coordinator observes something on a participant's body, they tap the relevant location on the diagram. A numbered marker is placed at that spot, and a detail sheet opens asking for:
- Type — Wound, Bruise, Rash, Pressure area, Swelling, Laceration, Burn, or Other
- Severity — Minor, Moderate, or Serious
- Description — a free-text note (e.g. "Stage 2 pressure area, approximately 2cm, left heel")
Each marker is colour-coded by type and numbered sequentially. Multiple markers can be placed across both the front and back surface. The summary list below the diagram shows all markers at a glance.
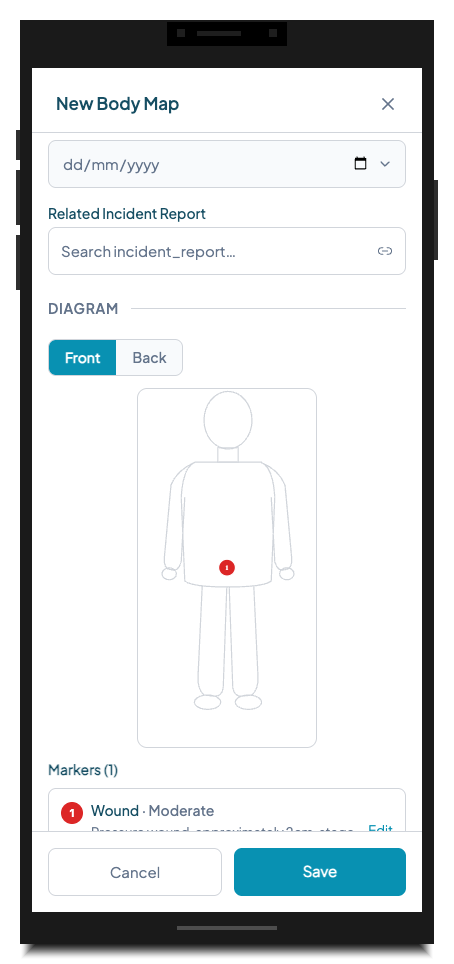
*A body map record in progress. Marker 1 is placed on the front abdomen. The annotation list below confirms the type and severity.*
---
When and why to use it
The body map field is designed for any documentation that requires locating observations on a person's body. In care settings, the most common uses are:
Skin integrity checks (NDIS and aged care) NDIS quality and safeguarding requirements, along with aged care accreditation standards, require that skin integrity findings are documented at admission and whenever a change is observed. A body map creates an unambiguous, time-stamped record — far clearer than a written description like "reddening on upper back, left side."
Wound documentation Community nurses, support workers, and personal care staff can record wound location, type, and progression over time. Multiple visits to the same participant build a longitudinal record showing whether a wound is improving or deteriorating.
Incident follow-up After a fall or physical incident, a body map attached to the incident report documents where bruising or injury was observed. This protects both the participant and your organisation if there is a later dispute about the nature or location of an injury.
Pre-support and post-support checks Some providers use body maps at the start and end of each shift to establish a baseline. If a new mark appears, there is a clear record of when it was first observed and by whom.
Risk assessments The body map field is included in Teiro's built-in Body Map entity type, and it can also be added to a Risk Assessment or Incident Report form where a visual record of the body is needed.
---
How to add a body map field to a form
Body map fields are added through the entity type builder in Settings.
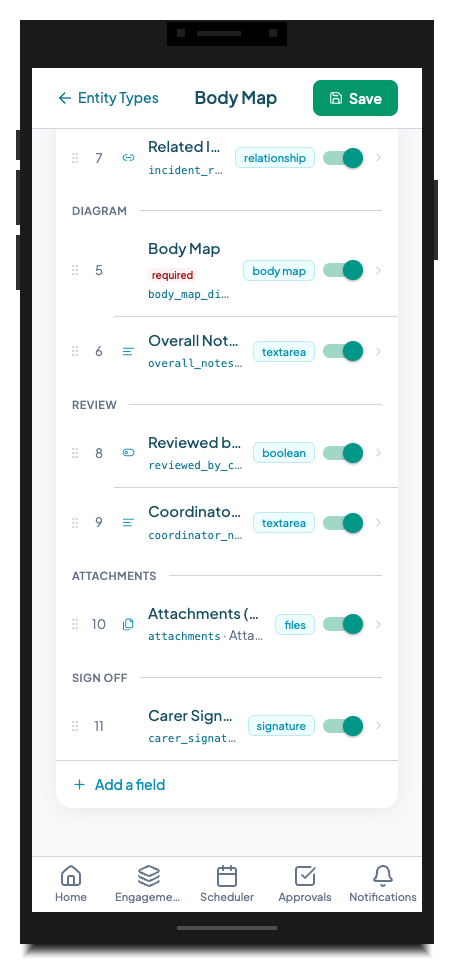
*The Body Map entity type in the entity type builder. The "body map" type badge identifies the field.*
Step-by-step
- 1.Go to Settings and tap Entity Types.
- 2.Select the entity type you want to add the field to, then tap Edit.
- 3.Scroll to the Fields section and tap Add field.
- 4.Enter a Field label — for example, "Body Diagram" or "Skin Integrity Check".
- 5.In the Field type selector, choose Body map.
- 6.Optionally add Help text — for example, "Tap the body outline to mark any observations. Add at least one marker before saving."
- 7.Set the field as Required if a record cannot be submitted without completing the diagram.
- 8.Tap Save field.
The field will appear in the form with the front/back silhouette rendered inline. No additional configuration is needed.
Tip: Give the field its own section heading (e.g. "Diagram") so it visually separates from the text fields above it. Long forms are easier to navigate when the diagram has its own clear section.
---
What the form looks like
When a carer or coordinator opens a new Body Map record, the diagram appears inline in the form below the standard detail fields. They tap anywhere on the silhouette to place a marker.
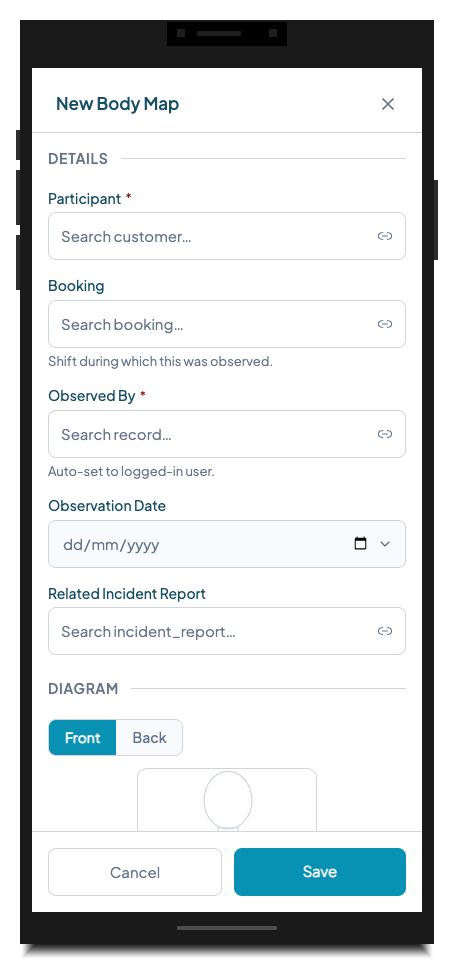
*The body map creation form. The silhouette appears under the Diagram section with Front/Back toggle.*
Tapping the silhouette opens the Add Marker sheet. The location is automatically derived from where the tap landed — displayed as a region label like "Front — Abdomen" or "Back — Lower Back."

*The Add Marker sheet. Type and severity are required; description is free text. The region is auto-detected from the tap location.*
---
What the data looks like
Each body map field value is stored as a list of markers. Each marker contains:
| Property | Example |
|---|---|
| Surface | `front` |
| Location (auto-detected) | `Front — Abdomen` |
| Type | `wound` |
| Severity | `moderate` |
| Description | `Pressure wound, approximately 2cm, stage 2` |
This structured data makes it possible to: - Filter records by marker type across a participant's history - Generate reports showing skin integrity trends over time - Export to PDF for handover or audit (each marker appears as a numbered entry with the diagram)
---
Tips and gotchas
Tap precision on mobile. The silhouette is sized to fill the width of the form. On smaller phones, taps near the edge of a limb can land slightly off the intended region. The auto-detected location label appears in the Add Marker sheet before you save — check it before tapping Save Marker.
You can edit or remove markers before saving. Each marker in the summary list below the diagram has an Edit button. Use this to correct a type, severity, or description before the record is submitted.
Maximum marker count. A single body map field supports up to 20 markers across both surfaces. In practice, most records have fewer than five. If you need to document more observations, consider whether a separate follow-up body map record is more appropriate.
Markers are not editable after saving. Once a body map record is submitted, the marker positions and details form part of the clinical record. To document a change, create a new body map record. This preserves the timeline of observations rather than silently overwriting previous findings.
System entity type vs. custom form. Teiro includes a built-in Body Map entity type in Settings > Entity Types > System. This is the recommended way to use body map documentation — it includes all the standard fields (participant, booking, observed by, observation date, overall notes, attachments, and carer signature). You can also add a body map field to a custom entity type if your workflow calls for it.
---
Try it in Teiro
Body map documentation is included in every Teiro plan. If you are not yet using it, navigate to Settings > Entity Types > System and review the Body Map entity type — it is ready to use without any configuration.
[Book a walkthrough](https://www.teiro.com.au/demo) to see body map and skin integrity documentation in action, or [start a free trial](https://www.teiro.com.au/signup) to try it with your own team.
Related articles
How to Create and Edit Dynamic Forms (Entity Types & Fields)
Build custom forms — called entity types — to capture any information your organisation needs, from incident reports to vehicle checks.
Submitting incident reports
Report incidents, near misses, or safeguarding concerns directly from the app.
Managing care plans
Create, update, and maintain care plans for each customer within Teiro.