Setting Permissions for Custom Entity Types in Teiro
Control who can create, view, and delete records for each custom entity type — including niche roles with very specific access.
Every custom entity type in Teiro has its own access controls. These let you decide precisely who can create records, who can view them, and who can delete them — down to a specific role if needed.
Where to find permissions for an entity type
- 1.Go to Settings > Entity Types.
- 2.Open the entity type you want to configure.
- 3.Scroll to the Access section.
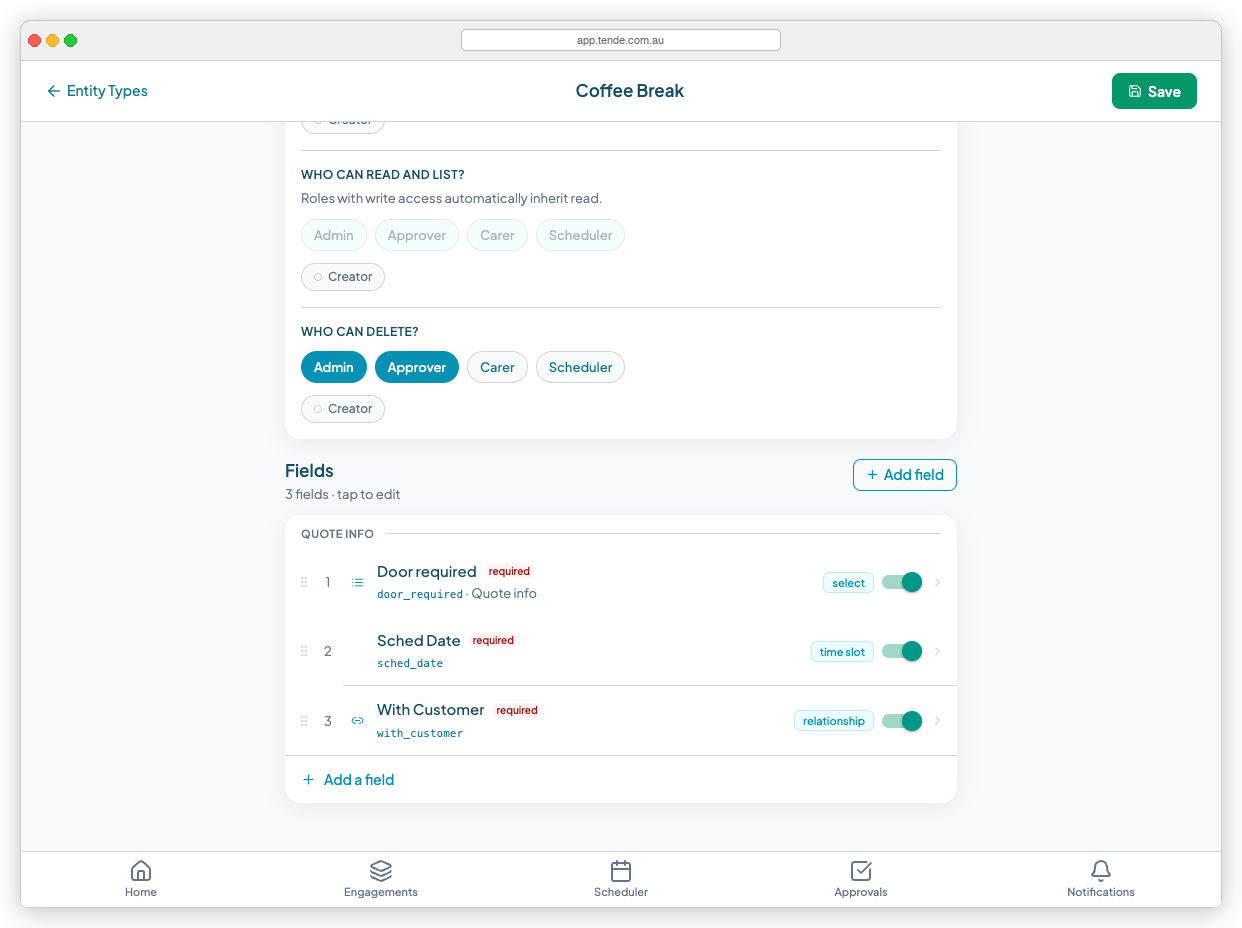
The Access section has three permission areas:
- Create / Edit — who can create new records and edit existing ones
- Read / List — who can view individual records and see them listed
- Delete — who can permanently remove a record
How permission levels work
| Option | What it means |
|---|---|
| Anyone | All logged-in users can perform this action |
| Specific roles | Only users with selected roles can perform this action |
| Creator | Only the person who originally created the record can perform this action |
| Nobody | No one can perform this action |
What "Creator" means
The Creator option restricts an action to the individual who created that specific record.
Example: If you set Delete to "Creator" on your Incident Report entity type, a carer who filed the report can delete their own report, but another carer cannot — even if they have the same role.
Assigning a niche role with limited access
Sometimes a role in your organisation should only interact with one specific form type. Here is how to set that up:
Step 1 — Create the role (if it doesn't exist)
- 1.Go to Settings > Roles.
- 2.Select Add role and name it (e.g. "Kitchen Supervisor").
- 3.Leave all default permissions off — you'll grant access only through the entity type.
- 4.Save the role.
Step 2 — Assign the role to the right users
Go to Team, open the relevant user's profile, and assign them the new role.
Step 3 — Grant access on the entity type
- 1.Open the entity type in Settings > Entity Types.
- 2.Open the Access section.
- 3.For the relevant permission (e.g. Delete), select Specific roles and add your new role.
- 4.Save the entity type.
That role now has access to that specific permission on that entity type only.
Common permission patterns
Incident reports — coordinator-controlled, carers read-only
| Permission | Setting |
|---|---|
| Create / Edit | Specific roles: Coordinator, Admin |
| Read / List | Anyone |
| Delete | Specific roles: Admin |
Carer self-service log (e.g. coffee break, vehicle check)
| Permission | Setting |
|---|---|
| Create / Edit | Anyone |
| Read / List | Anyone |
| Delete | Creator |
Sensitive internal notes — restricted visibility
| Permission | Setting |
|---|---|
| Create / Edit | Specific roles: Admin |
| Read / List | Specific roles: Admin, Coordinator |
| Delete | Specific roles: Admin |
Tips
- Default to least access. Start narrow and open up if needed.
- Test with a non-admin account. Log in as a user with the role you configured and confirm actions behave as expected.
- Roles stack. If a user has multiple roles, they get the combined permissions of all their roles.
Related articles
How to Create and Edit Dynamic Forms (Entity Types & Fields)
Build custom forms — called entity types — to capture any information your organisation needs, from incident reports to vehicle checks.
Managing roles and permissions
Control what each team member can see and do with Teiro's role-based access system.
How to Allocate Dynamic Events to Users on the Roster
Create records of custom entity types — like coffee breaks or vehicle checks — and place them on the scheduler roster against a specific carer.