
Before you start
Five minutes of reading that will save you a lot of clicking.
Who this guide is for
Teiro is used by three groups of people, and they use very different parts of it. This guide is split the same way, so you can hand your team the part that applies to them.
| If you are | You mostly do | Read |
|---|---|---|
| A coordinator or scheduler | Build the roster, keep clients' records right, watch the day, check the paperwork | Part A, The office |
| A support worker or carer | See your shifts, check in, record what happened, finish up | Part B, The carer app |
| An owner or administrator | Set the organisation up, decide who can do what, configure billing | Part C, Administration, plus Part A |
Most people only ever need one part. If you are a small provider, one person may wear all three hats, and Teiro handles that: the menus you see are built from the roles you hold, so an owner who also does visits gets both the office screens and the carer screens in the same app.
Teiro is one product. The office screens and the carer screens are the same application, shown on a desktop browser and on a phone. Nothing is installed differently and nothing is missing on one or the other, except where a feature genuinely needs a phone, such as taking a photo or using your location to check in.
The words Teiro uses
A few words mean something specific in Teiro. They are worth learning now because they appear on every screen.
| Word | What it means |
|---|---|
| Service | One booked piece of work for one client at one time: the visit itself. Everything that happens in the field hangs off a service, including notes, medications, travel and incidents. |
| Customer or Client | The person receiving support. Their file holds contacts, funding, medications, documents and history. |
| Worker or Carer | A member of your team who delivers services. |
| Record type | A kind of thing Teiro stores: clients, workers, services, notes, incidents, leave requests, and around fifty more. Your administrator can add your own. |
| The board | The scheduling screen, where each carer has a lane and each service is a block. |
| Verification | The short check, after a visit, that confirms it happened as booked. It is what releases the visit for billing. |
If your organisation says "participant" rather than "customer", or "shift" rather than "service", an administrator can rename them once and the whole app follows. See C3, Terminology. This guide uses the default words.
Part A · The office
For coordinators and schedulers.
This part covers the whole office day: the people you support, the team who visit them, the roster that connects the two, and the records that prove it all happened.
- Best on a laptop or desktop
- Works on a phone too
- Sections A1 to A20
A1. Signing in
Go to your organisation's Teiro address in a browser. You can sign in in two ways, and either is fine.
- With Google, Microsoft or Apple. Tap the button for whichever account your work email uses. You will not need a separate Teiro password.
- With an email and password. Enter the email your organisation invited, then your password.
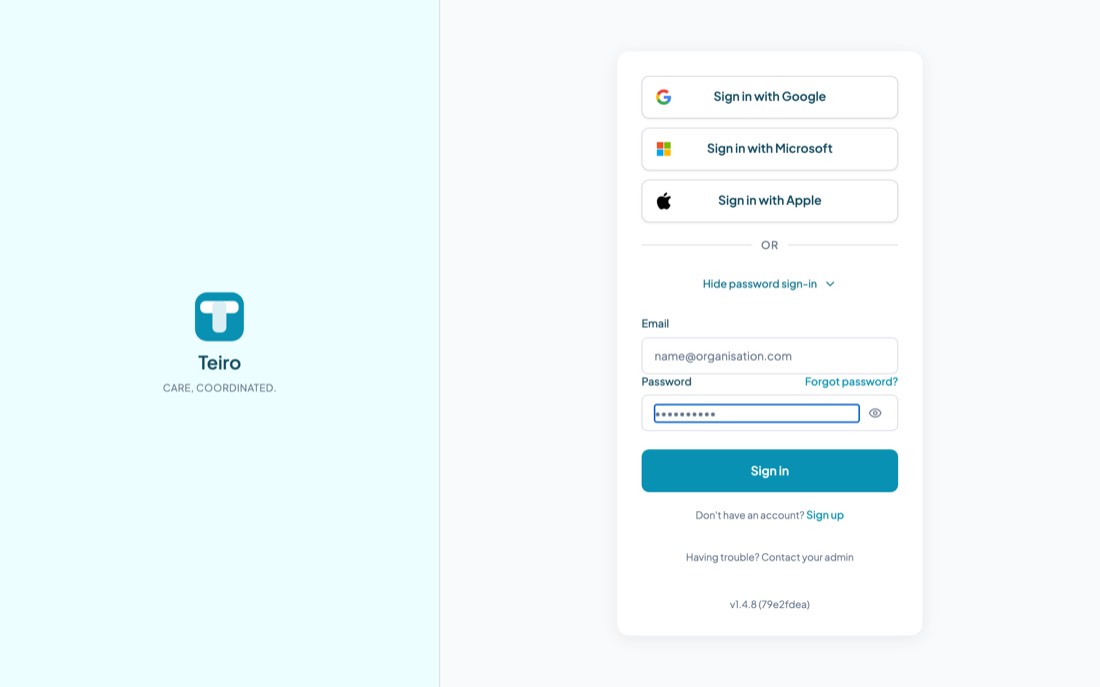
If you have forgotten your password, use Forgot password? and Teiro will email you a reset link. If you have never set one, because you were invited and signed in with Google the first time, keep using that button rather than setting a password.
Invitations are tied to one email address. If you were invited at one address and are trying to sign in with another, it will not match. Ask your administrator to check the address on your invitation, or to resend it. See C6, People and access.
A2. Your home screen
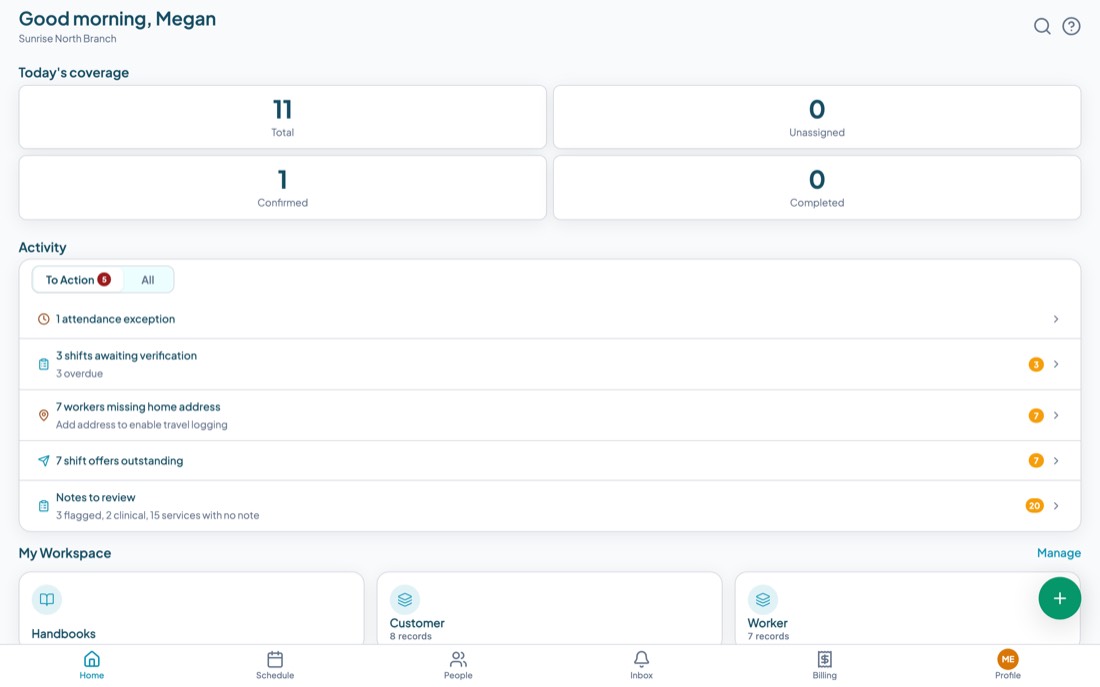
Home is a working screen, not a dashboard you glance at. It is built to answer one question: what needs me today?
Today's coverage
Four numbers for today: Total services, how many are Unassigned, how many are Confirmed, and how many are Completed. Each one is a button. Tapping Unassigned, for example, takes you to the board already filtered to the gaps, which is usually the first thing you want in the morning.
Activity
This is your to do list, and Teiro builds it for you. It has two tabs: To Action, which is only things that need a decision, and All, which is everything that has happened recently. Items you are likely to see:
| Item | What it is telling you |
|---|---|
| Attendance exception | A visit did not start or finish the way it was booked. Somebody arrived late, left early, or has not checked out. |
| Shifts awaiting verification | Completed visits whose after visit check has not been done. Overdue ones are counted separately. |
| Shift offers outstanding | Open shifts you have offered to the team that nobody has taken yet. |
| Notes to review | Notes flagged for follow up, clinical notes, and completed services with no note at all. |
| Workers missing home address | Travel cannot be calculated for these workers until an address is on file. |
| Self managed customer missing email | You cannot send this client an invoice directly until you have an email address for them. |
| Unfinished notes | A note you started and did not post. Teiro keeps the draft and offers it back to you. |
Every row opens the thing it is talking about, so you can clear them one at a time rather than hunting.
My Workspace
Shortcuts to the lists you use most. Teiro starts you with a few, and Manage lets you add, remove and reorder them. Add the record types your job actually touches: if you handle incidents every week, put Incident Report here and stop navigating to it.
The Profile menu
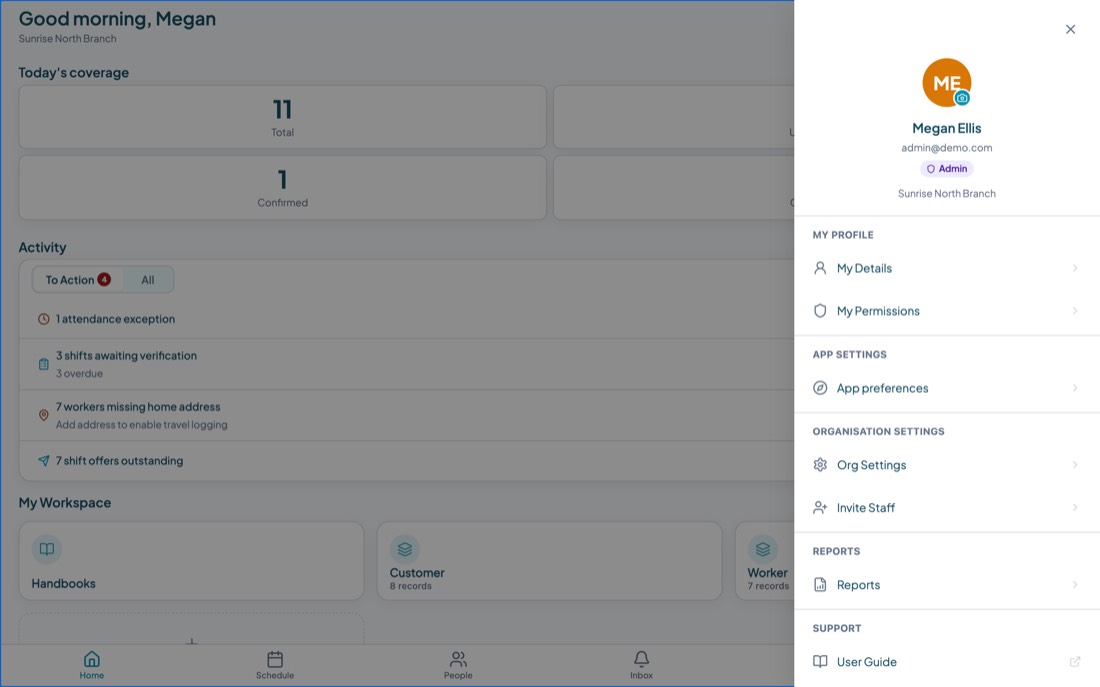
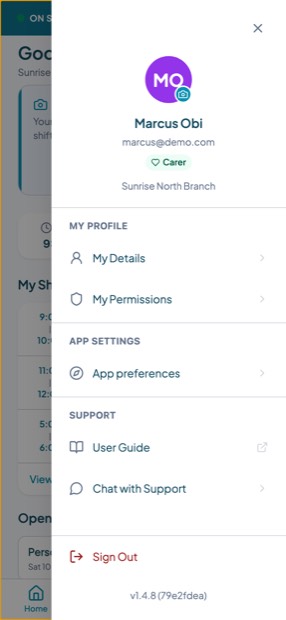
The Profile tab at the bottom right is not just your account. It is where the rest of the app lives: Org Settings, Invite Staff, Reports, App preferences, My Permissions, this User Guide and Chat with Support. If you cannot find a screen, look here first.
The green button
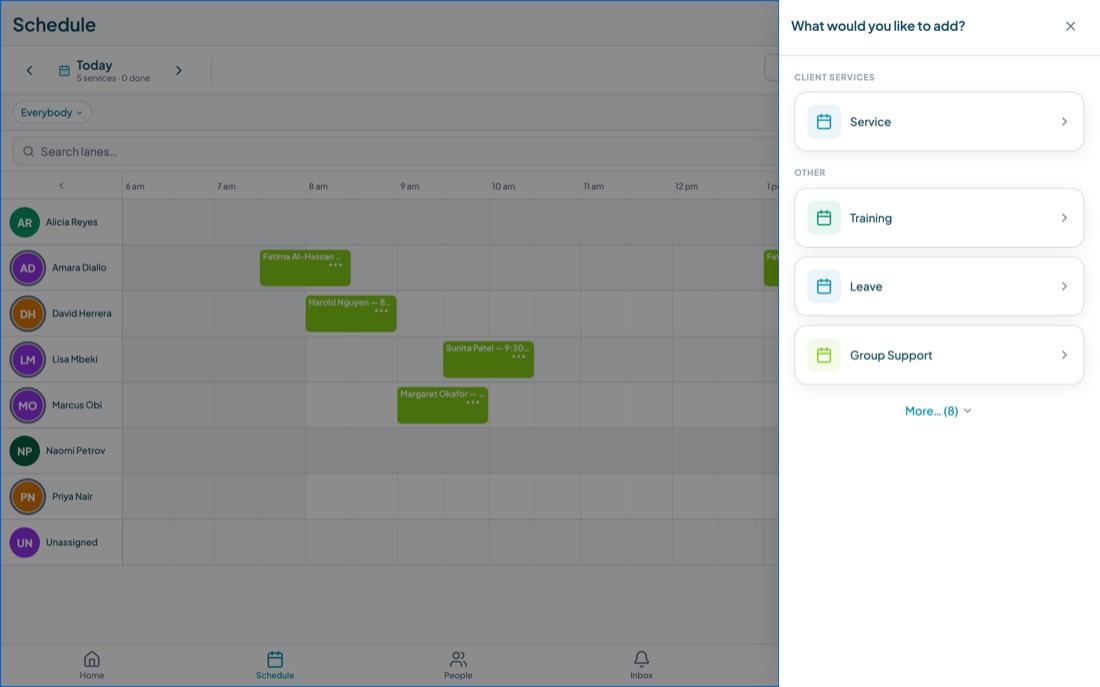
The round + button at the bottom right creates a new record. What it offers depends on where you are: on Home it is a general "new entry", and on the board it offers a service or a recurring schedule.
A3. Finding anything
There are three ways to reach a record, and they suit different moments.
- Search, the magnifying glass at the top right of Home, when you know the name. Type at least two characters. It searches across record types, so a client, a worker and a service can all come back in one list.
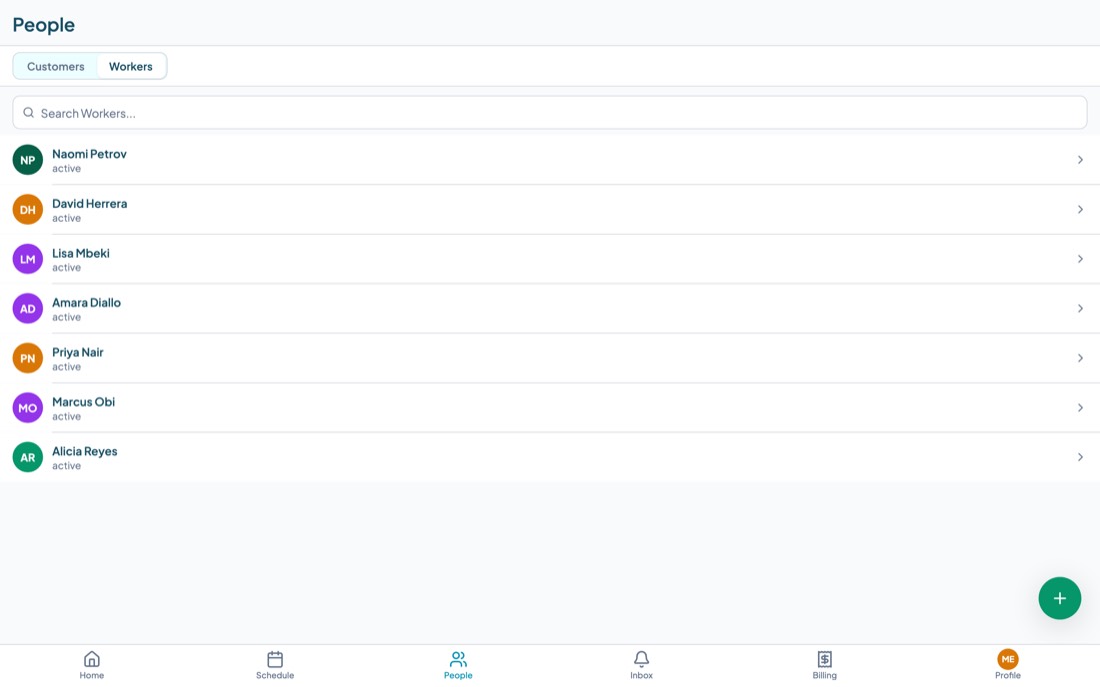
- The People tab, when you want to browse. It has two tabs of its own, Customers and Workers, each with its own search box.
- Lists, when you want everything of one kind. Every record type has a list, reachable from your workspace shortcuts or from the browse screen. Pin the ones you use to your workspace so they are one tap away.
A4. The client file
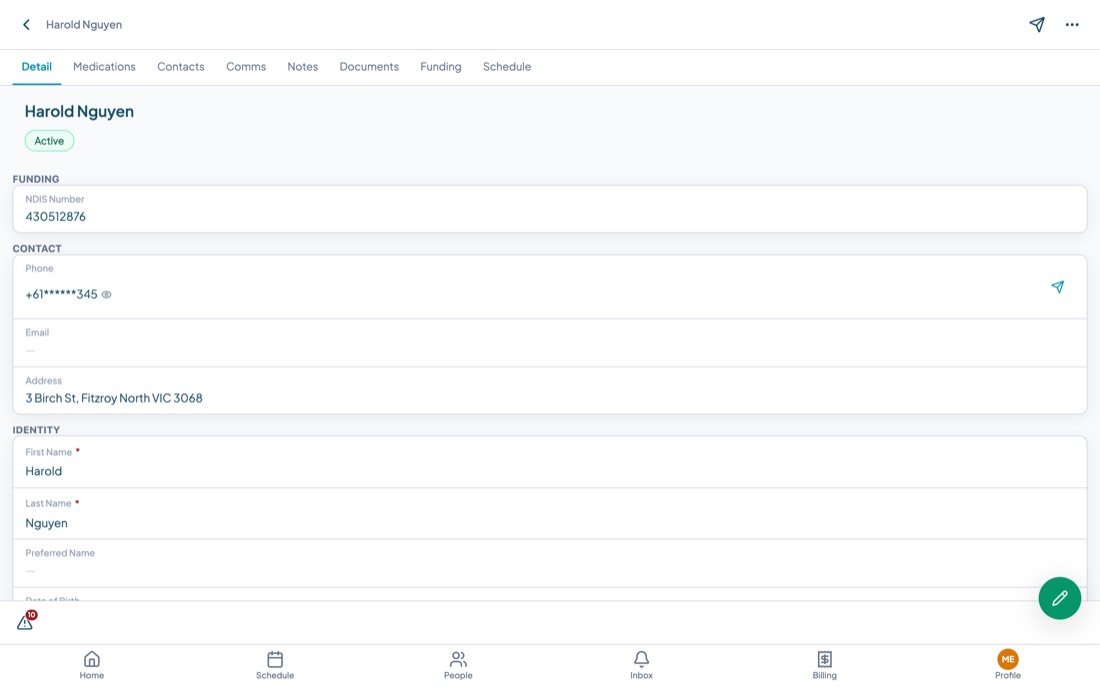
Open a client from People and you land on their file. This is the single most important screen in Teiro for office staff: everything about that person is on it, split across tabs.
Detail
The facts about the person, grouped into sections you can scroll: funding, contact, identity, clinical, access, GP and specialist. It is worth filling in properly, because several of these fields do real work later:
- Access instructions and key safe code appear to the carer in their pre shift briefing, so they are not ringing you from the doorstep.
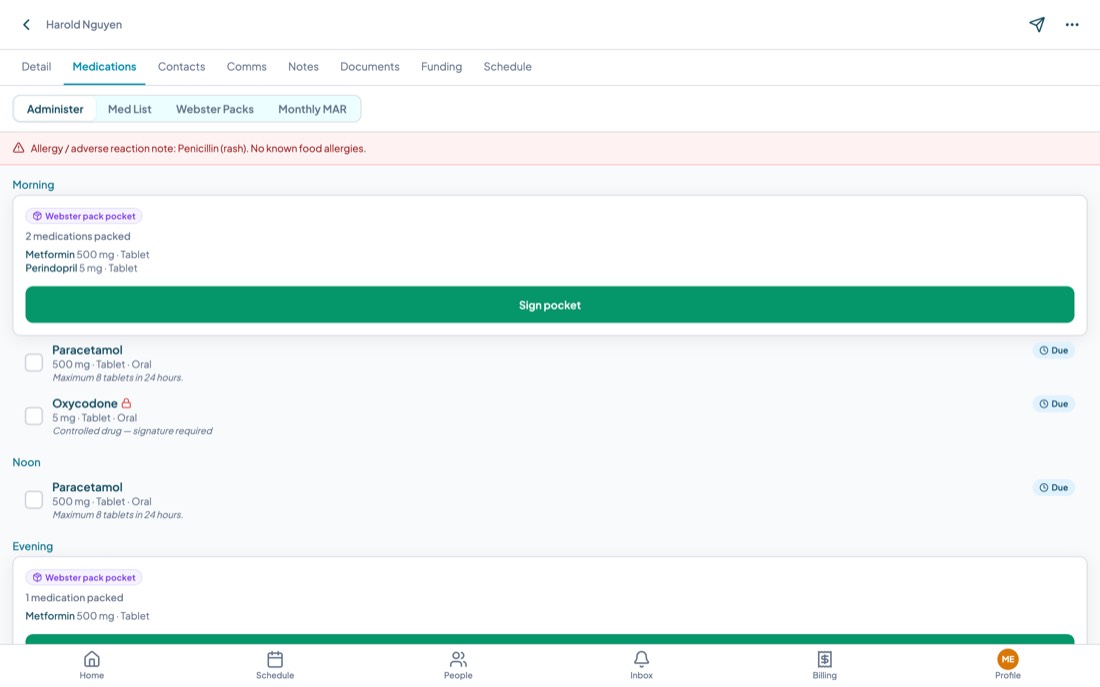
- Allergies and allergy severity appear as a banner on the medication screens.
- Address drives travel distance and the geographic check when a carer checks in.
- Carer preferences, at the bottom, holds this client's preferred carers and any carers who must not be sent. Exclusions are enforced when you assign, not just advisory.
Phone numbers are masked by default and revealed with the eye icon, which keeps a client's number off a shared screen.
To change anything, use the pencil button at the bottom right. The paper plane at the top right starts a message to the client, and the ... menu holds the less common actions.
Schedule
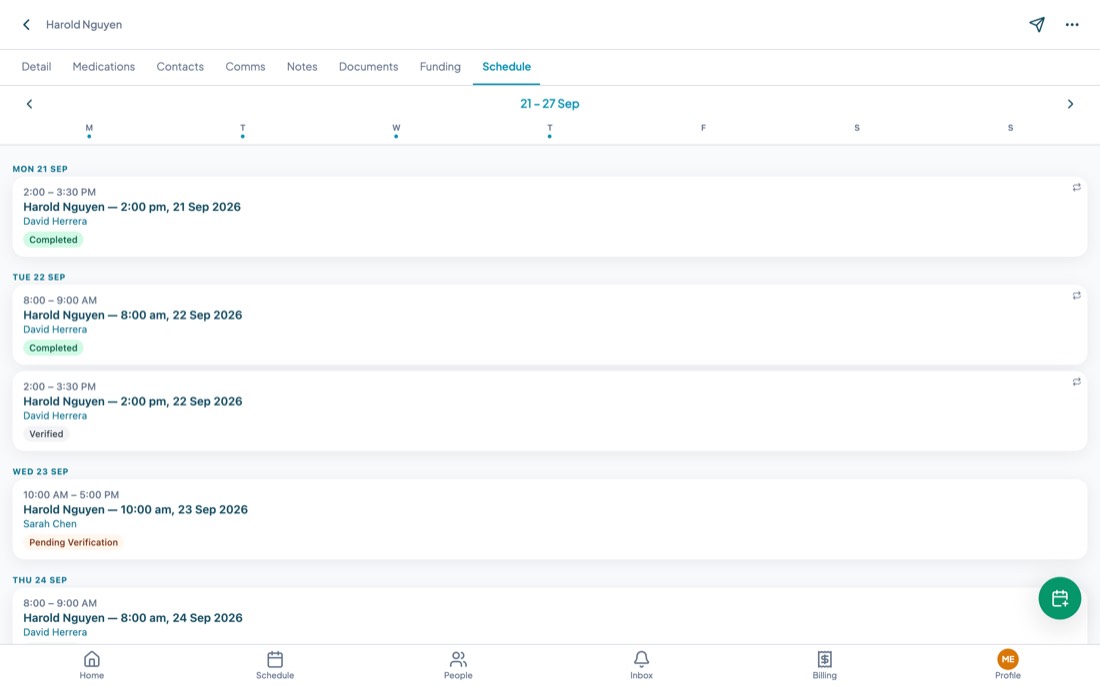
Everything booked for this client, a week at a time, with the carer's name and the status of each visit. Use the arrows to move week by week, and the button at the bottom right to add a service for this client without going to the board.
Notes
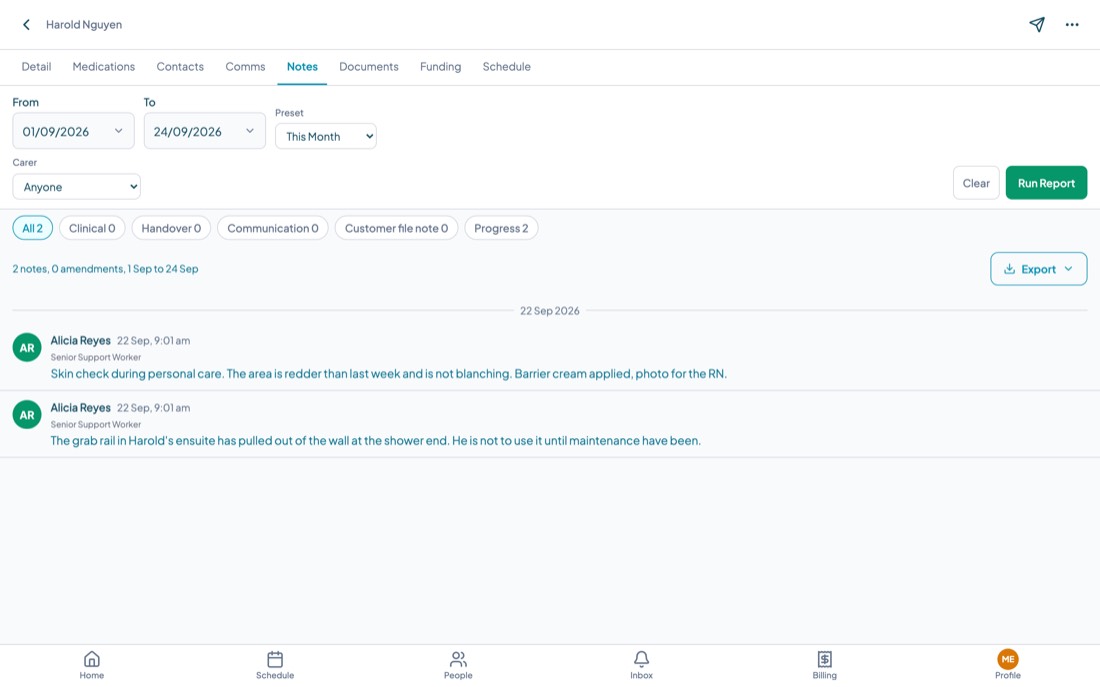
Every note written about this client, filtered how you like: a date range or a preset, a particular carer, and a note type. The counts on the chips are live, so you can see at a glance that there are, say, two progress notes and no clinical ones this month. Export produces a file of exactly what you have filtered, which is what you want when a family or an auditor asks for a client's record.
Medications
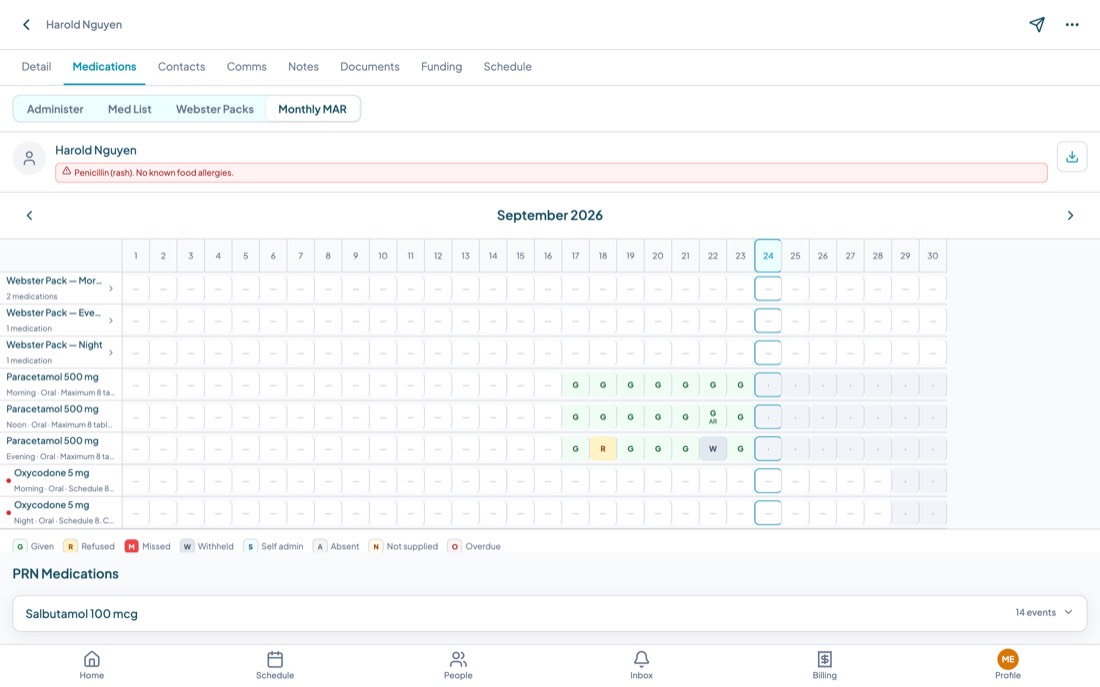
The client's medication chart, covered properly in B6 because carers use it most. From the office, the four tabs are: Administer for today, Med List for the standing orders, Webster Packs for packs from the pharmacy, and Monthly MAR for the signed record of the month.
Contacts
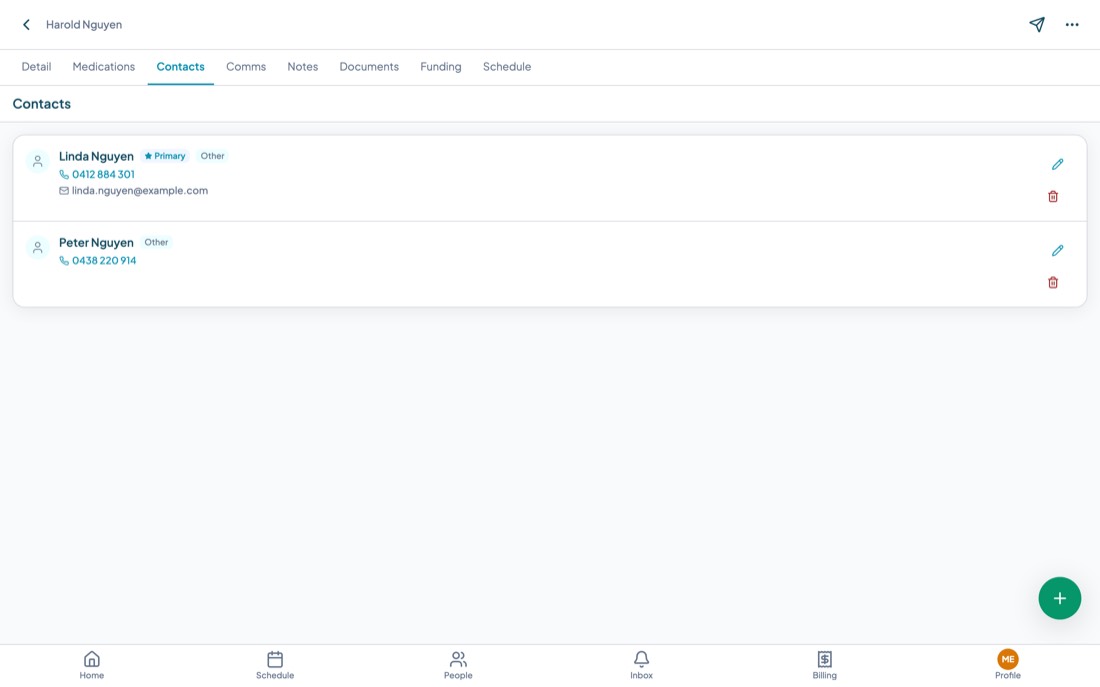
Family, guardians, emergency contacts and anyone else who matters. Add them here rather than burying a phone number in a note.
Documents
Files attached to this client: plans, assessments, consent forms, letters. Drag a file onto the tab or tap to browse. Teiro accepts JPG, PNG, HEIC, GIF, PDF and MP4 up to 50 MB each.
Funding
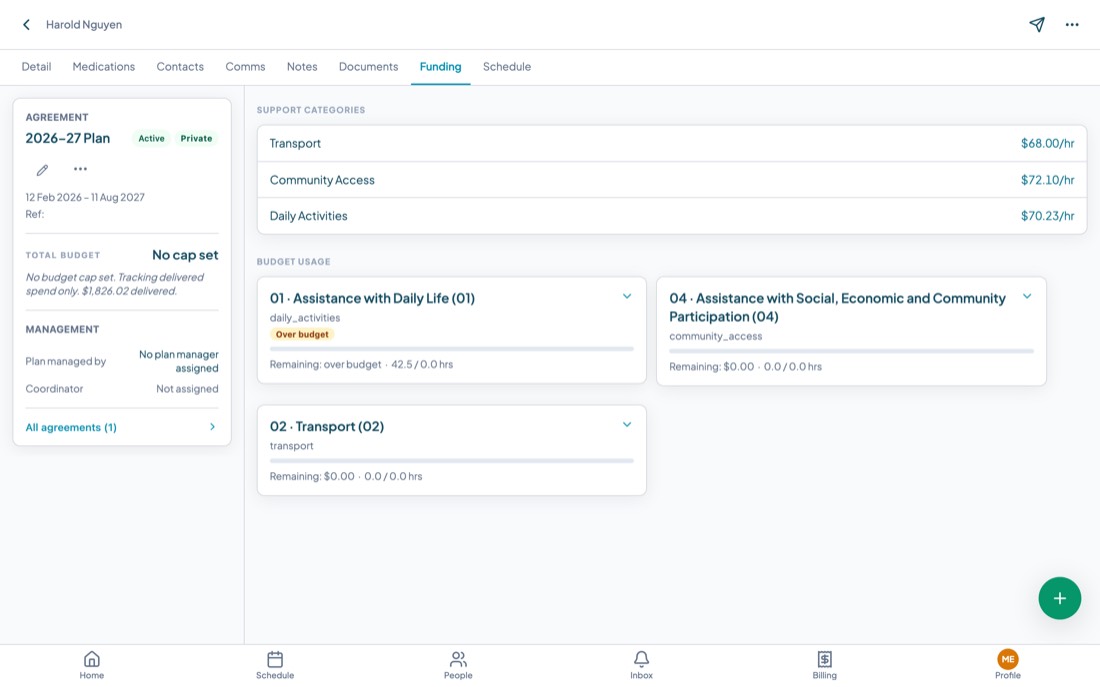
The client's service agreements and how much of each budget has been used. The agreement card shows the period, the total budget, whether a plan manager is involved, and the support categories with their hourly rates. Below it, a bar per support category shows what has been delivered against what was agreed.
Comms
Day of contact conversations for this client: the message threads between the client and whoever is visiting them. Threads open automatically when a carer is assigned and close afterwards, which is the point. See A17.
A5. Adding a client
- Go to People, stay on the Customers tab.
- Tap the green + button at the bottom right.
- Fill in at least a first and last name. Everything else can follow.
- Save, then open the new file and add the things that make visits work: address, phone, access instructions, and any allergies.
Add the client, then their service agreement on the Funding tab, then book services. Services booked before an agreement exists cannot be matched to funding, and you will have to go back and fix them at billing time.
A6. Your team
A member of your team exists twice in Teiro, and it helps to know why:
- A user is a login. It carries their roles, which decide what they can see and do.
- A worker is a record about the person: their job title, documents, availability and schedule. This is what appears on the board.
Inviting someone creates the login. Their worker record is what you fill in afterwards.
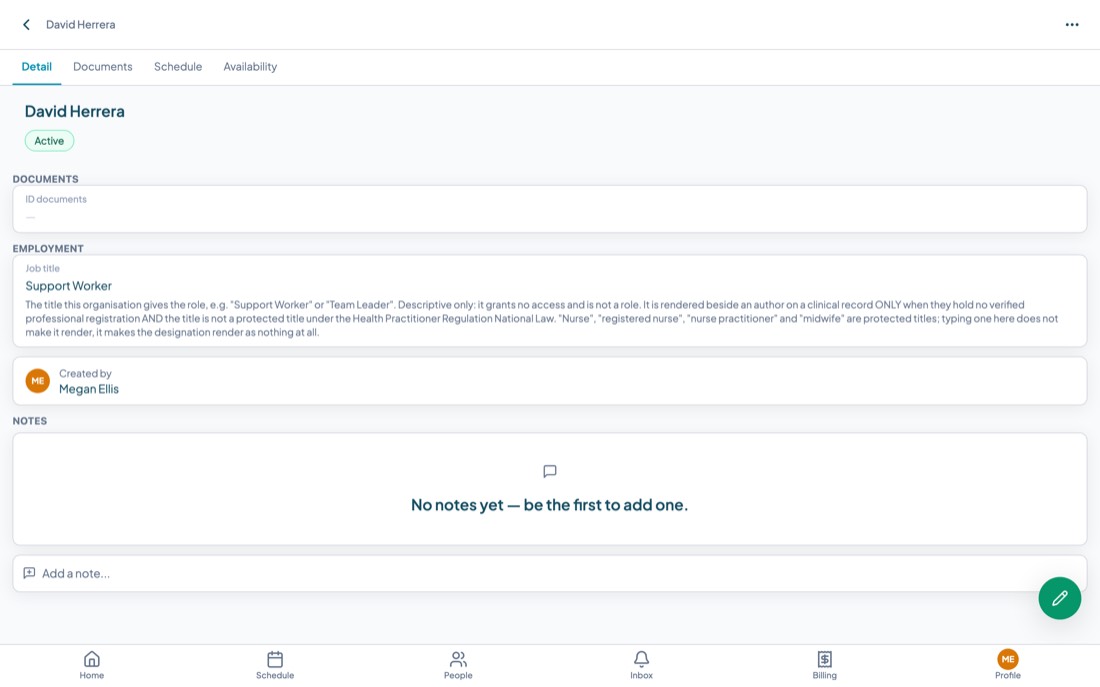
- Detail: job title, employment details and identification documents.
- Documents: certificates, checks and anything with an expiry date worth tracking.
- Schedule: what this worker is rostered on, week by week.
- Availability: the hours they are willing to work. The assignment screen uses this to tell you who is actually free.
To invite someone, open the Profile menu at the bottom right, choose Invite Staff, enter their details and pick a role. Roles are covered in C6.
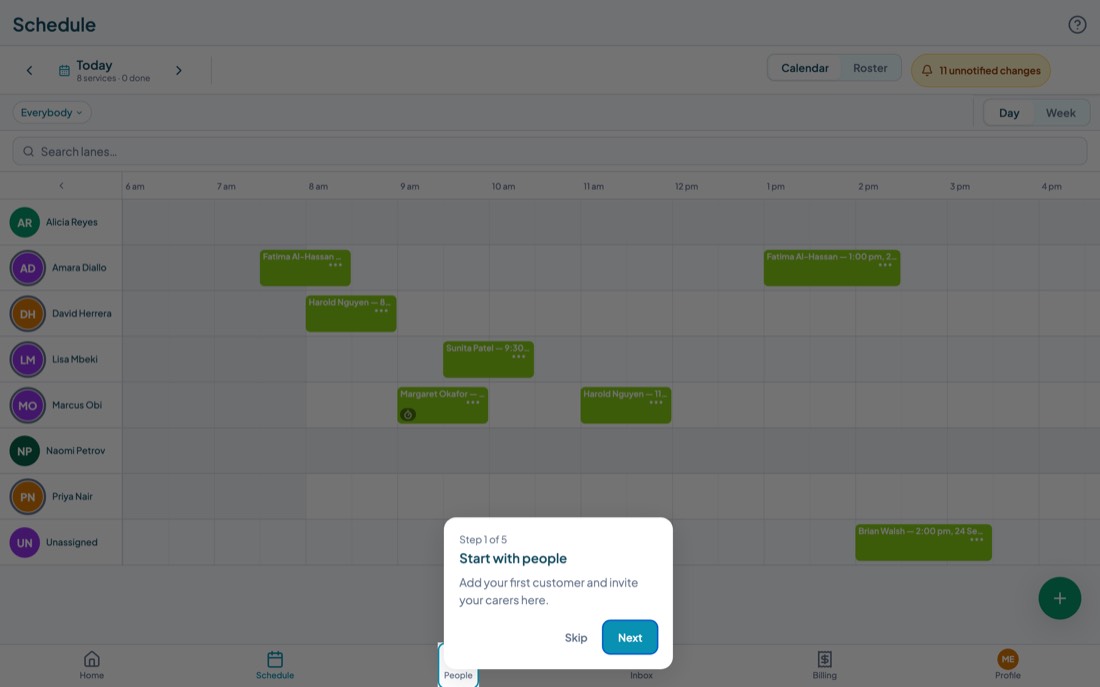
A7. The schedule board
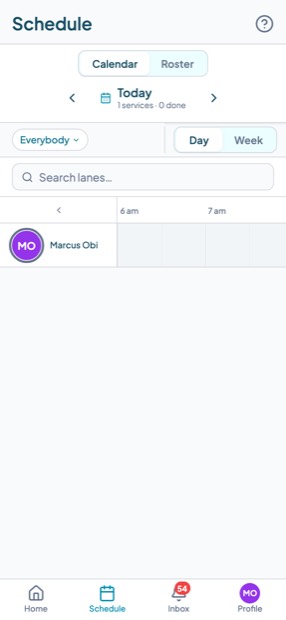
The board is where the roster lives. Each row is a carer, each block is a service, and time runs left to right.
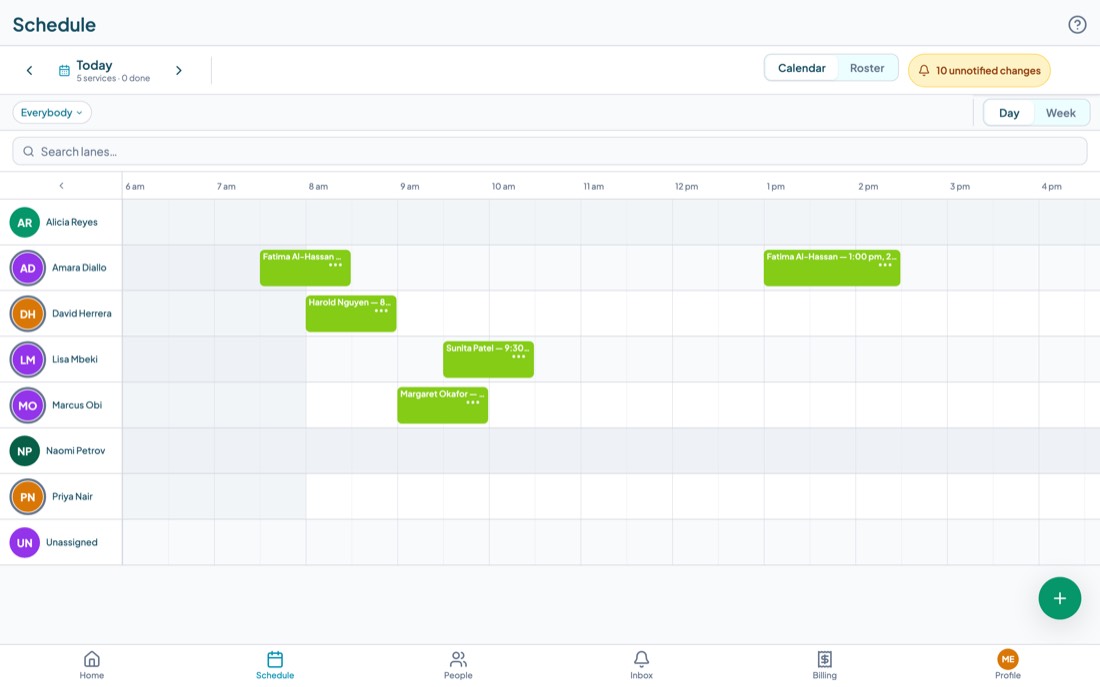
Across the top you have:
- The date, with arrows either side and a Today shortcut. Tapping the date opens a date picker. Underneath it, a count: how many services that day and how many are done.
- Calendar or Roster. Calendar is the timeline you see above. Roster is the same day as a readable list per carer, which is easier to scan and better on a phone.
- Day or Week. Week view shows seven days at once, which is how you spot a pattern of gaps.
- Everybody, a filter for narrowing the lanes down to a team or an individual.
- Search lanes, for finding one carer quickly when you have forty.
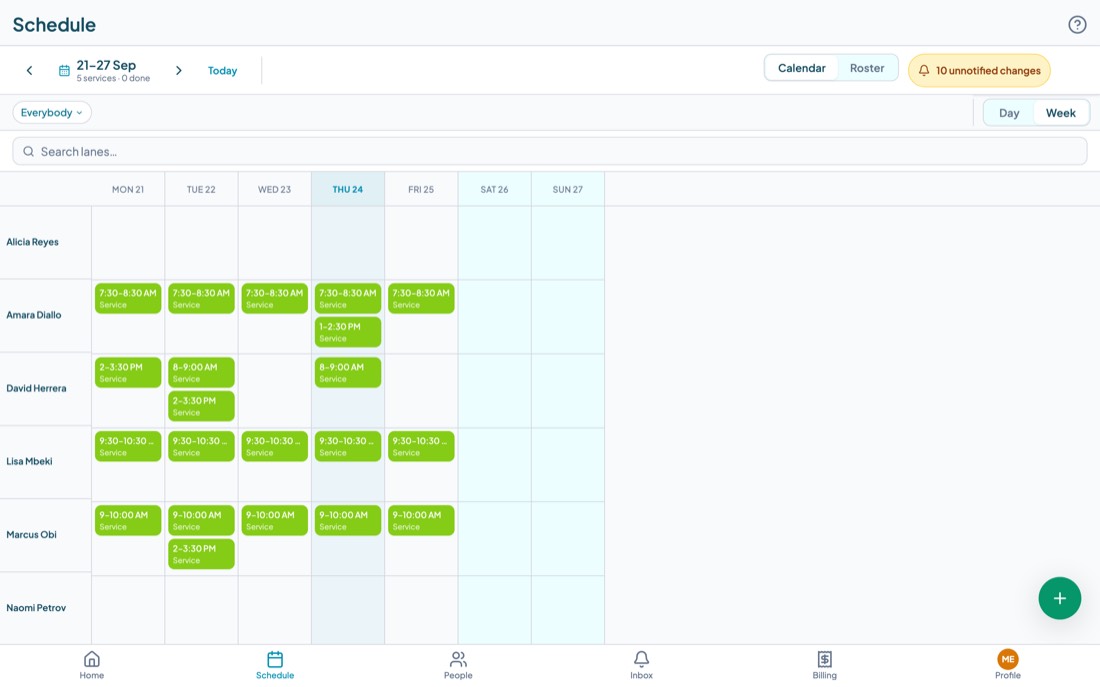
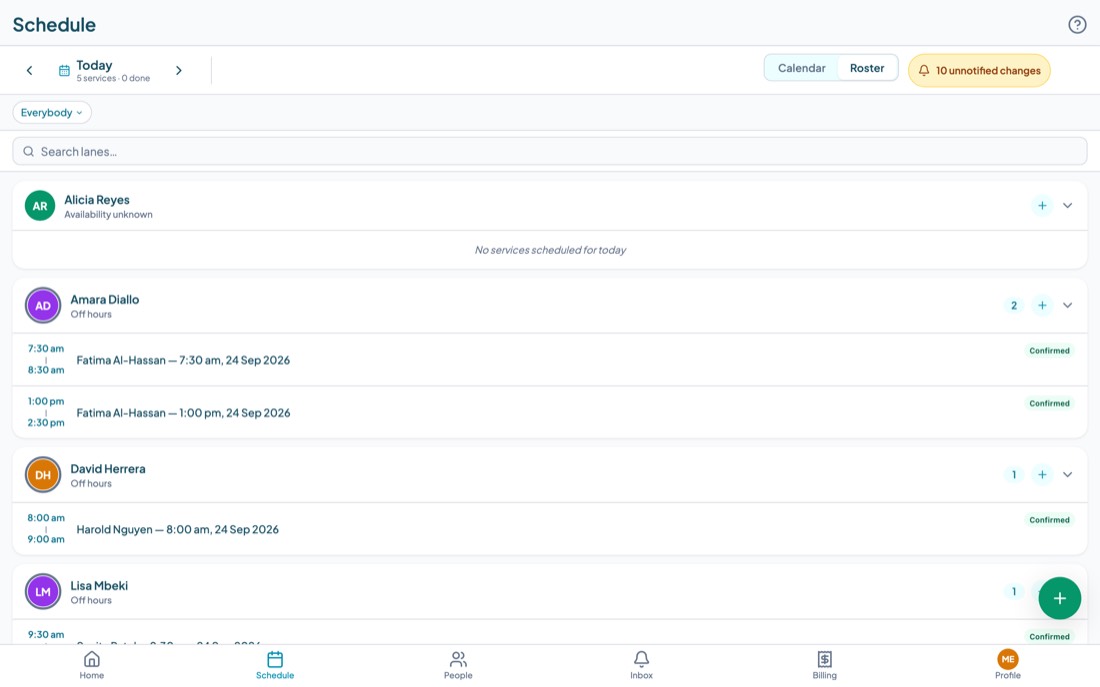
Service blocks are coloured by status, and the ... on a block opens its quick actions. Tapping a block opens the full service.
Anything not yet given to a carer sits in the Unassigned lane at the bottom. That lane being empty by the end of the day is the whole job. If it is not empty, offering the shift to the team is usually faster than ringing around.
A8. Booking a service
- On the board, tap the green + button.
- Choose One off service for a single visit, or Recurring schedule for something that repeats. Recurring is covered in A9.
- Choose what you are adding. Service is a client visit. The other options, such as Training, Leave and Group Support, are for things that take a carer's time without being a client visit, and they appear on the board so you can see why someone is unavailable.
- Fill in the form and save.
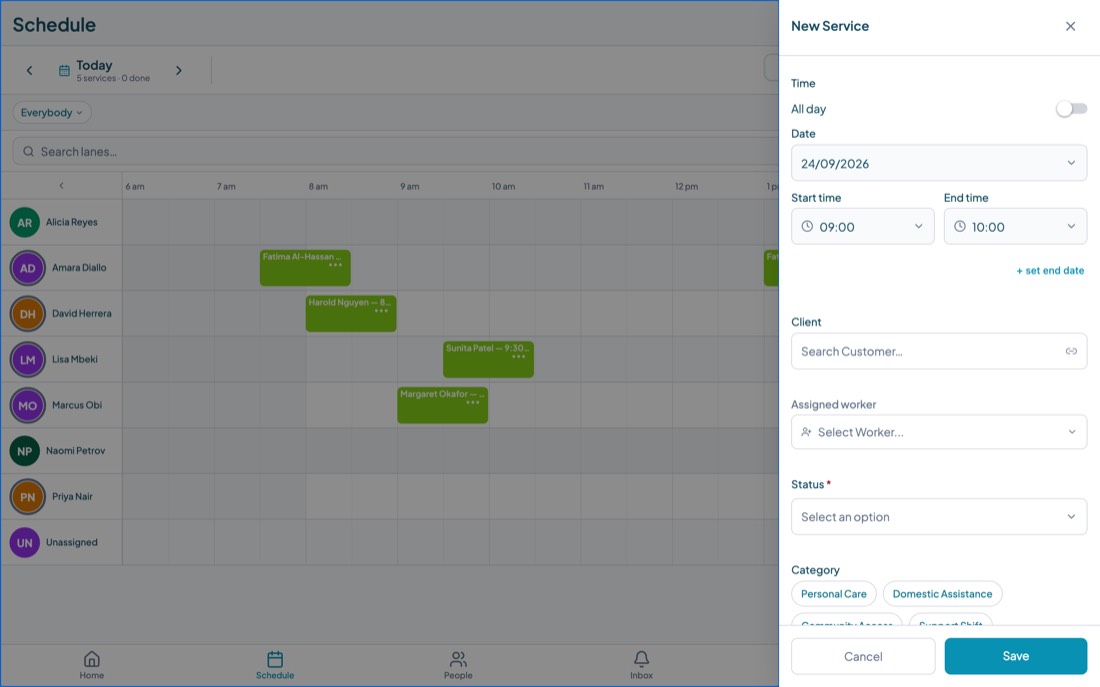
The fields that matter:
| Field | Notes |
|---|---|
| Date and time | Start and end time, or tick All day. Use + set end date for anything crossing midnight, such as a sleepover. |
| Client | Search by name. This drives the address, the medications and the care tasks the carer will see. |
| Assigned worker | Optional. Leave it empty and the service goes to the Unassigned lane, which is a perfectly good way to work: book first, staff later. |
| Category | Personal Care, Domestic Assistance, Community Access or Support Shift. You can pick more than one where a visit genuinely covers more than one. This is what billing maps to a support item. |
| Agreement | Which service agreement this visit is delivered under. Setting it here saves a correction at billing time. |
| Service delivery address | Only needed when the visit is somewhere other than the client's home. |
A9. Recurring schedules
Most care is a pattern, not a one off. A recurring schedule describes the pattern once and Teiro creates the visits.
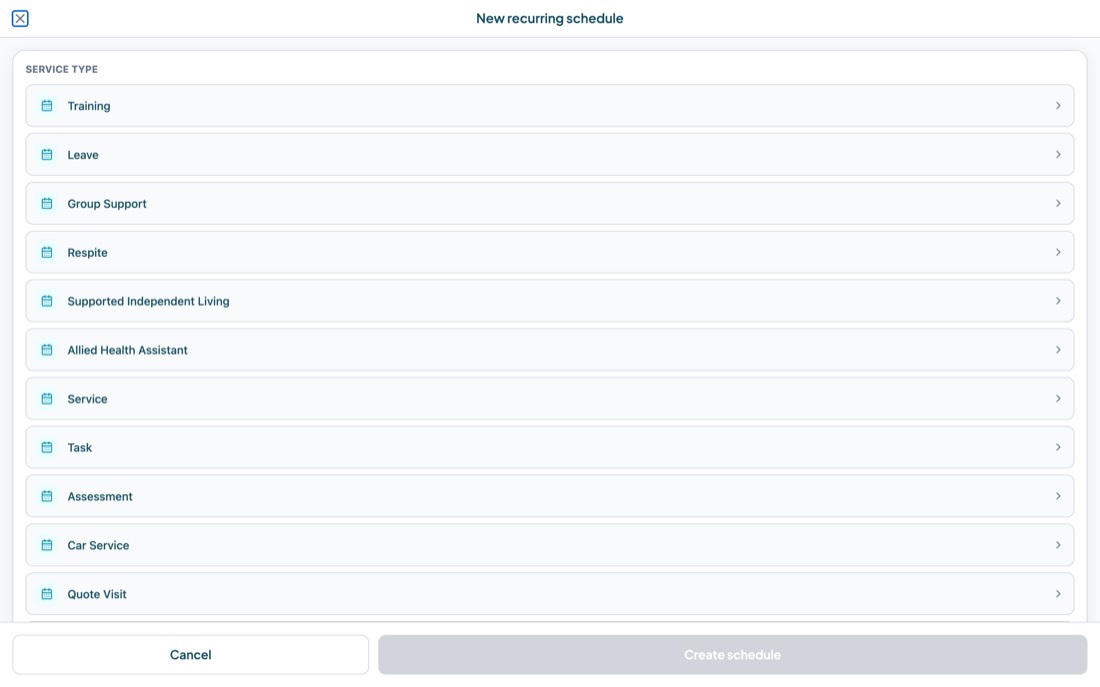
- Pick the service type.
- Set the recurrence: Weekly, Fortnightly, Monthly or Daily, then tick the days.
- Set the service time and duration. The duration buttons cover the common lengths, or type your own.
- Set the date range. Leave the end date empty for an ongoing arrangement.
- Check the recurrence preview, which spells out in words what you are about to create, then Create schedule.
Once created, a visit generated from a schedule shows a small repeat marker, and opening one gives you Manage series so you can change or cancel the whole pattern rather than every occurrence.
When you change a visit that belongs to a series, be deliberate about whether you mean this one occurrence or the series. Changing the series changes every future visit in it.
A10. Assigning a carer
Open the service and tap Assign Worker. The panel that slides in tells you who can actually do it.
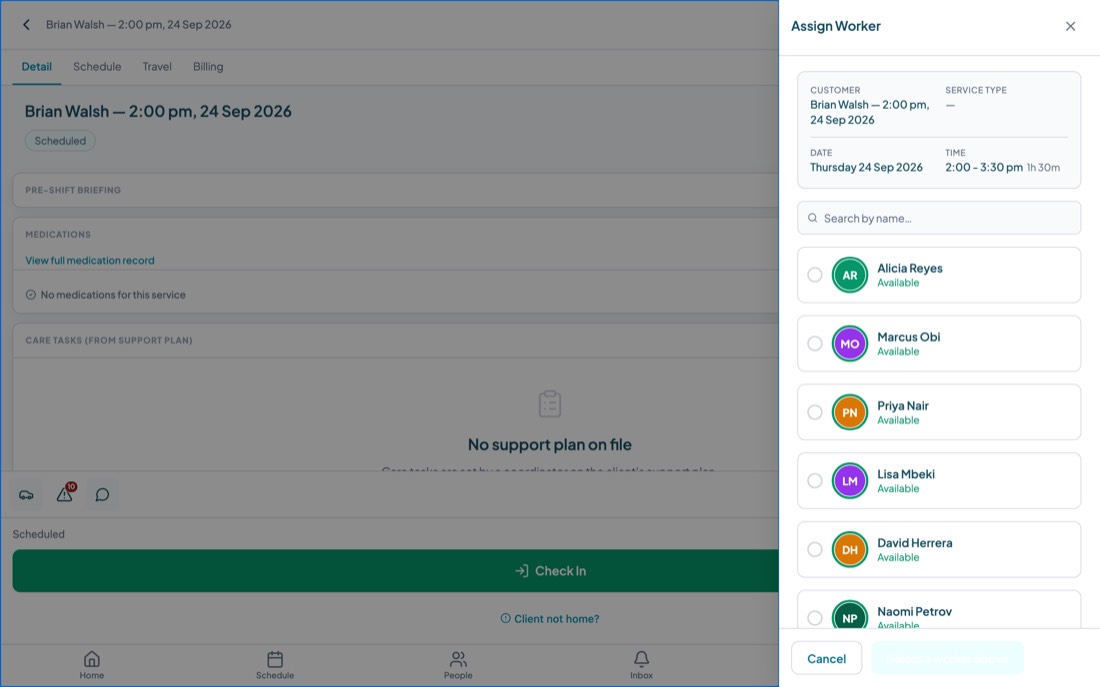
The panel summarises the service at the top, then lists your workers. Each is labelled: Available, or Unavailable with a reason such as "Not available", meaning their stated availability does not cover that time.
Underneath the list is Offer to team, for when you would rather ask than decide.
Teiro applies your organisation's rules when it builds this list. Carers a client has excluded, and carers who do not hold a qualification the client's plan requires, are filtered or blocked rather than left for you to remember. Your administrator controls how strict this is: see C6.
A11. Offering a shift to the team
Instead of ringing five people, offer the shift and let the app do it. From the Assign Worker panel, tap Offer to team.
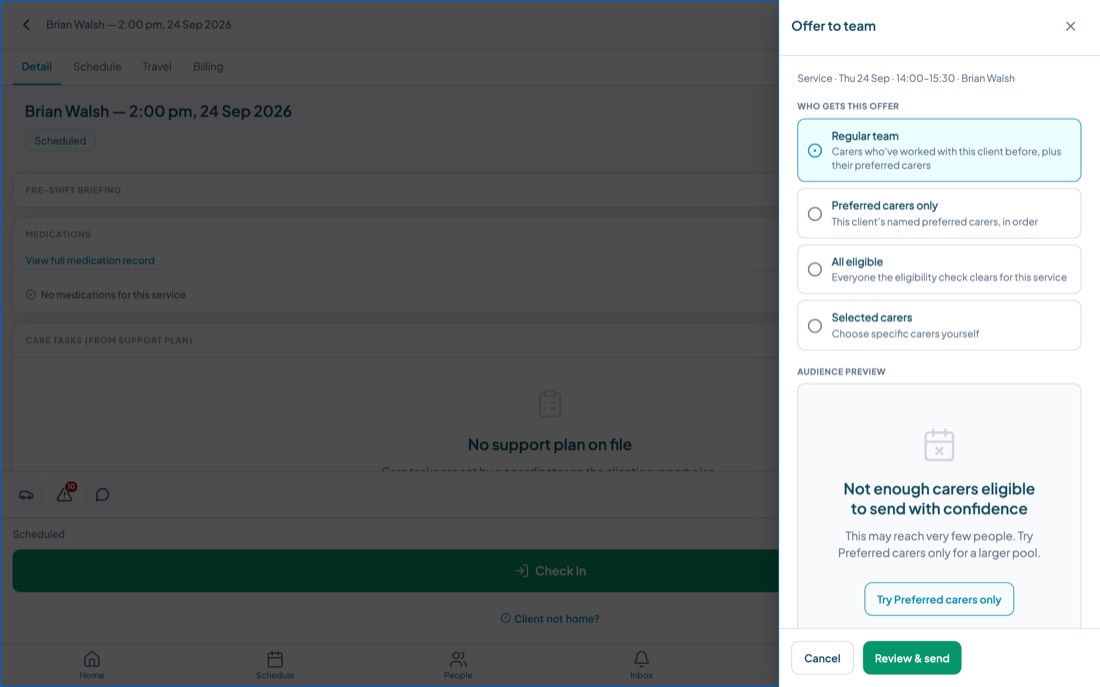
Who gets this offer
| Regular team | Carers who have worked with this client before, plus their preferred carers. |
| Preferred carers only | The client's named preferred carers, in the order they are listed. |
| All eligible | Everyone the eligibility check clears for this service. |
| Selected carers | You pick the individuals yourself. |
Under the choices, an audience preview tells you how many people will actually receive it, and warns you when that number is too small to be worth sending. Take the warning seriously: a narrow offer that nobody answers costs you an hour.
How it resolves
- First to accept gives the shift to whoever answers first. Fastest, and right for most cover.
- I'll choose collects the responses and lets you pick. Right when the client is complex or the responses need weighing.
Teiro sets a closing time automatically, shown on the sheet, and closes the offer early as soon as it is filled. Offers that are still open appear on your Home screen under Activity so they do not get forgotten.
A12. Telling people about changes
When you change the roster, the people affected need to know. Teiro batches this rather than sending a message on every keystroke.
A pill appears at the top of the board reading, for example, 11 unnotified changes. Tap it to see exactly what is queued and who it affects.
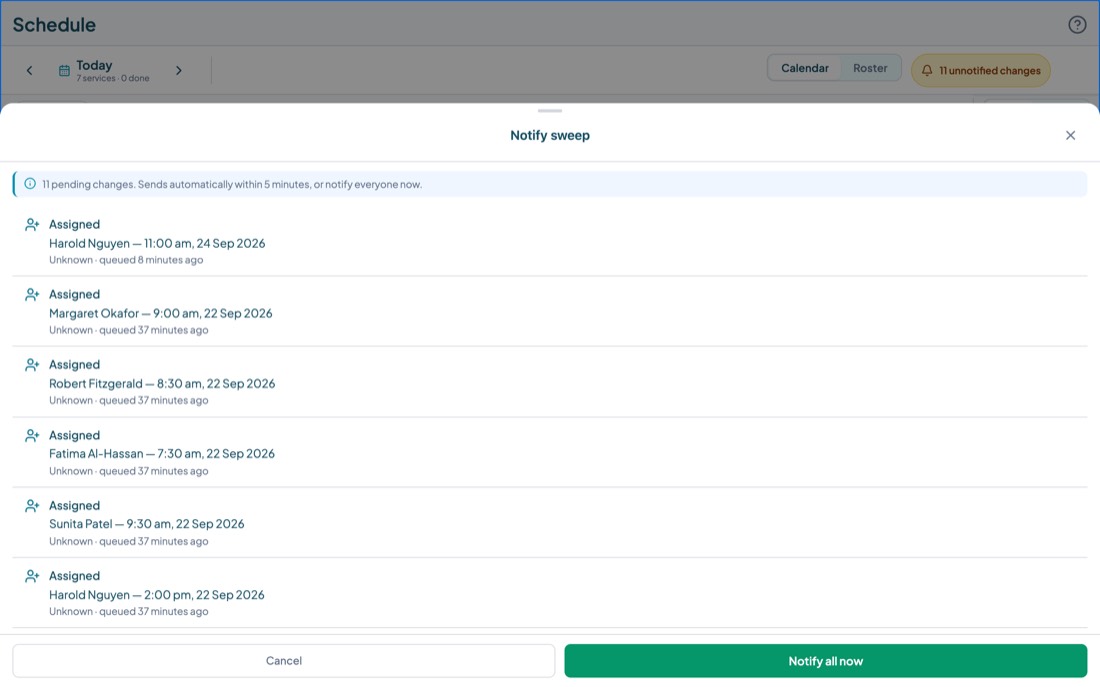
Leave it alone and the changes go out on their own within five minutes, which is what you want while you are still moving things around. Tap Notify all now when you have finished and want people told immediately.
A13. Watching the day
Once the roster is set, the job becomes noticing when reality does not match it. Teiro raises three things, all of which land in Activity on your Home screen.
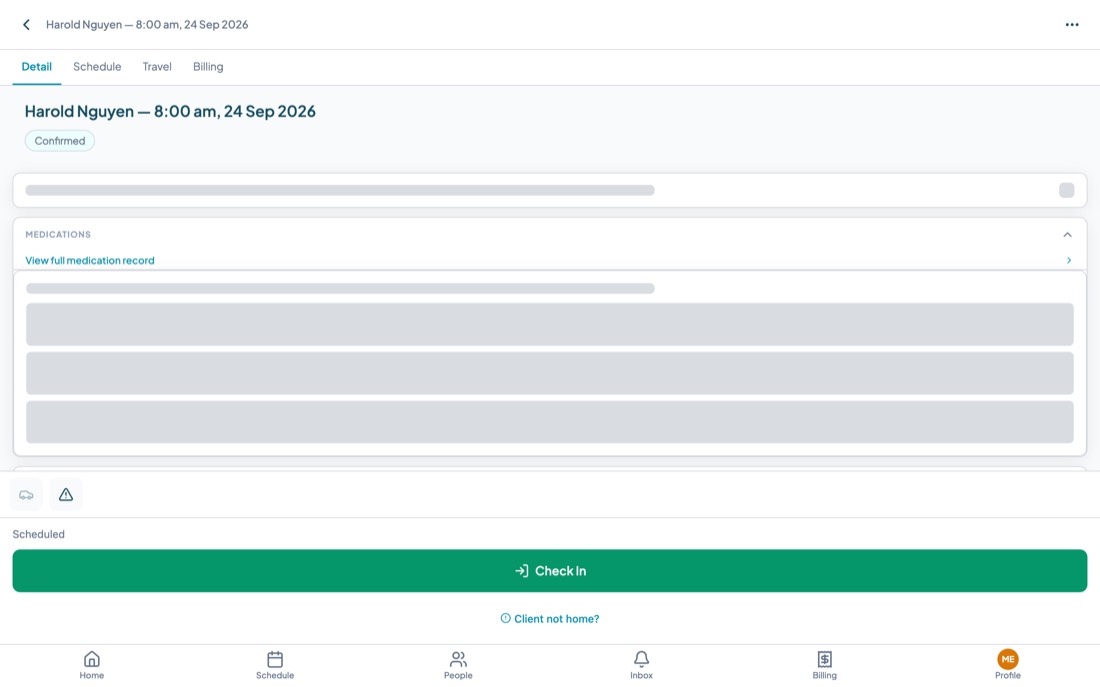
All three start from the same place: the service itself. Opening a service from the board gives you its whole story, including the check in history and any notes written against it.
Attendance exceptions
A visit that did not start or finish as booked: a late arrival, an early finish, or a carer who has not checked out. Open the exception to see what happened and put it right.
Client not home
When a carer arrives and cannot get in, they report it from their phone in two taps, choosing a reason and adding a note for you. That raises an alert to the office straight away rather than sitting in a text message on somebody's personal phone. The carer's side of this is in B7.
Services with no note
Completed visits that nobody wrote up. This is the one that quietly becomes an audit problem, so it is counted separately and shown on the notes review screen. See A15.
A14. Verifying services
Verification is the check after a visit that says: this happened, as booked, and here is the evidence. It is what releases a visit for billing, so a backlog here becomes a cash flow problem.
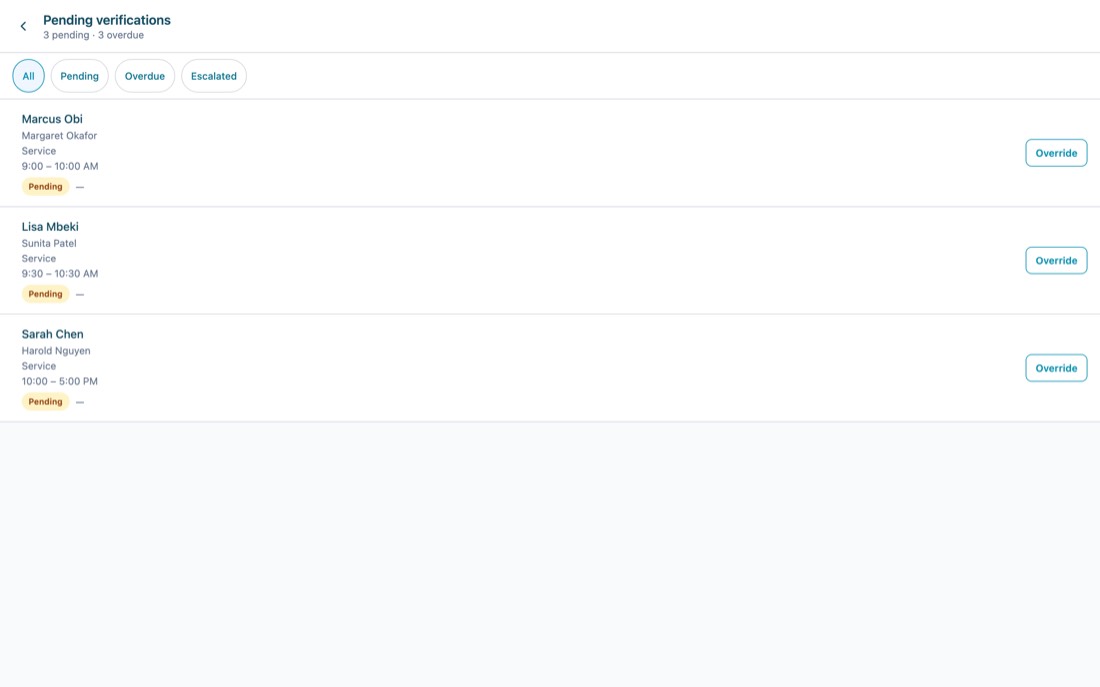
Reach it from Activity on Home, or from the pending verifications screen. The tabs are All, Pending, Overdue and Escalated, and the counter at the top tells you how many of each.
Normally the carer completes the checklist on their phone at the end of the visit. When they cannot, or did not, you have Override, which lets a coordinator complete the verification instead. An override is recorded as an override, with who did it and why, so the record still tells the truth.
A15. Notes
Notes are the written record of care. They are written mostly by carers, on their phones, against a service. The office's job is to review them.
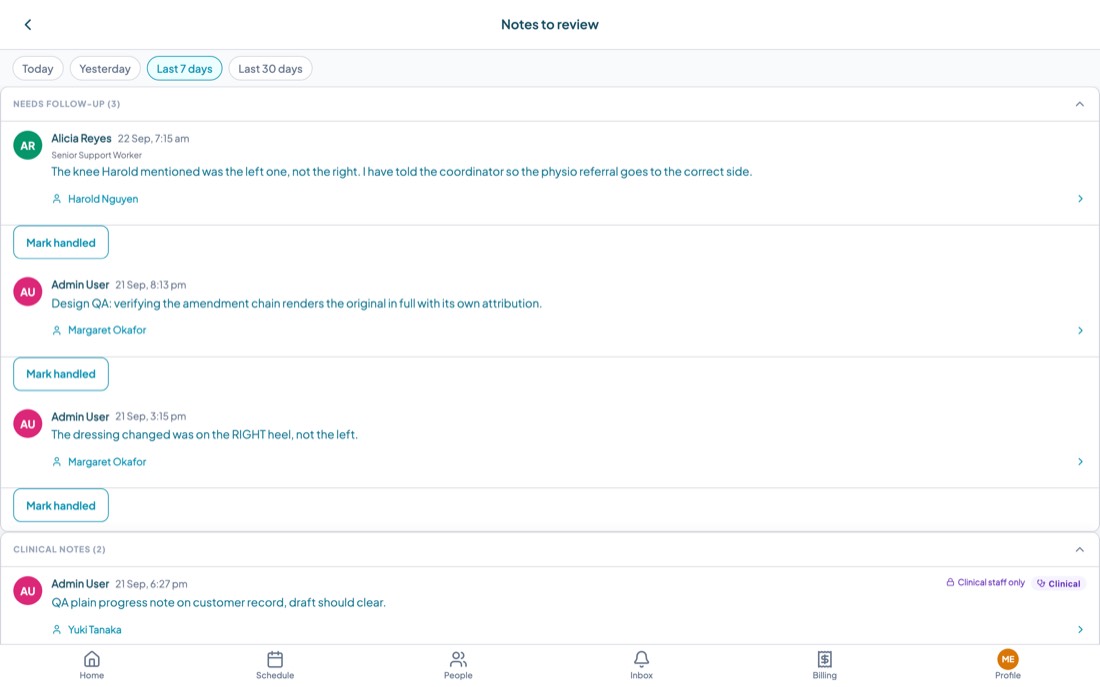
The review screen groups notes into four blocks:
- Needs follow up: a carer ticked "follow up" when writing. These are asking you for something. Mark handled when you have dealt with it.
- Clinical notes: notes marked clinical, which are restricted to clinical staff.
- Services with no note: completed visits with nothing written. Each row tells you how long ago it was completed.
- Everything else: the routine ones, for when you want to read the week.
Use the period buttons at the top, Today through Last 30 days, to set how far back you are looking.
A posted note can be amended, and the amendment is recorded alongside the original. Both stay on the record, which is exactly what an auditor expects to see. You will notice amendments counted separately on the client's Notes tab.
A16. Incidents
An incident report can be raised by a carer from the visit they are on, or by the office from the incident list. Either way it lands in the same place.
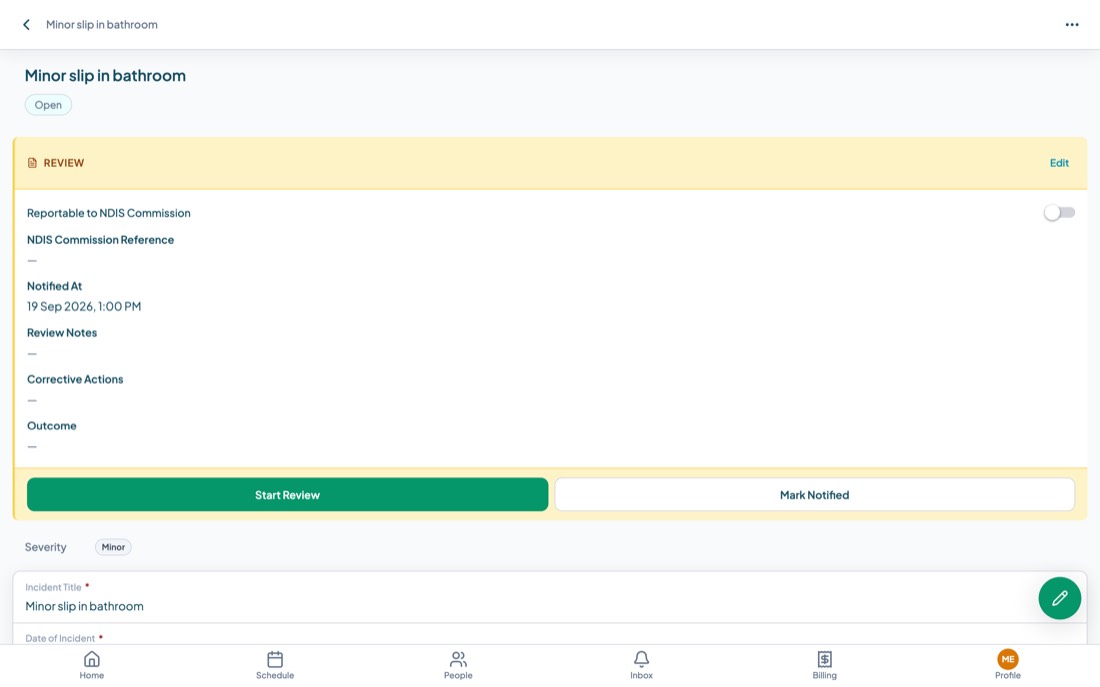
The report itself captures what happened: severity, type, date and time, location, who was involved, the description and the immediate actions taken. It is linked to the client and to the shift it happened on, so the context is never lost.
The Review section at the top is the office's work:
- Start Review moves it from reported to being looked at, and records who is reviewing.
- Reportable to NDIS Commission, with a field for the Commission reference and the date and time you notified them.
- Review notes, corrective actions and an outcome, which is what closes the loop.
Marking an incident notified records that you notified them. Submitting to the NDIS Commission is still something a person does, through the Commission's own portal, within the timeframe that applies. Teiro's job is to make sure the record and the date are there afterwards.
A17. Messaging
Teiro has two kinds of messaging and they behave very differently on purpose.
Team messages
Announcements to your staff, from the office. They appear in everyone's Inbox under a Team heading, and Teiro counts how many people have acknowledged each one. That count is the useful part: "0 of 18 acknowledged" is an answer to "did everyone see the policy change?".
Day of contact messages
Messages between a client and the carer who is visiting them, tied to a specific visit rather than an open ended chat. A thread opens when a carer is assigned and closes afterwards. You can see every thread from the client's Comms tab, open or closed, and read what was said.
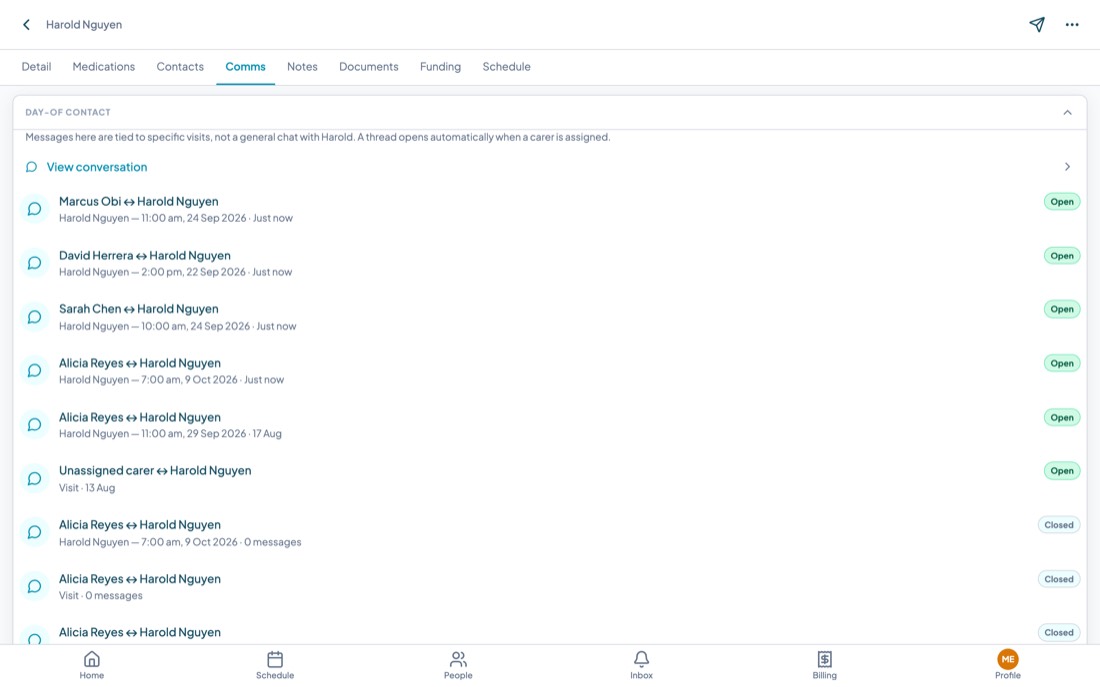
Tying the channel to a visit is a safeguarding control, not a limitation. A carer can reach the client about today's visit, and that access ends with the assignment. Nothing becomes a private, permanent line between a worker and a client that the office cannot see.
Your Inbox
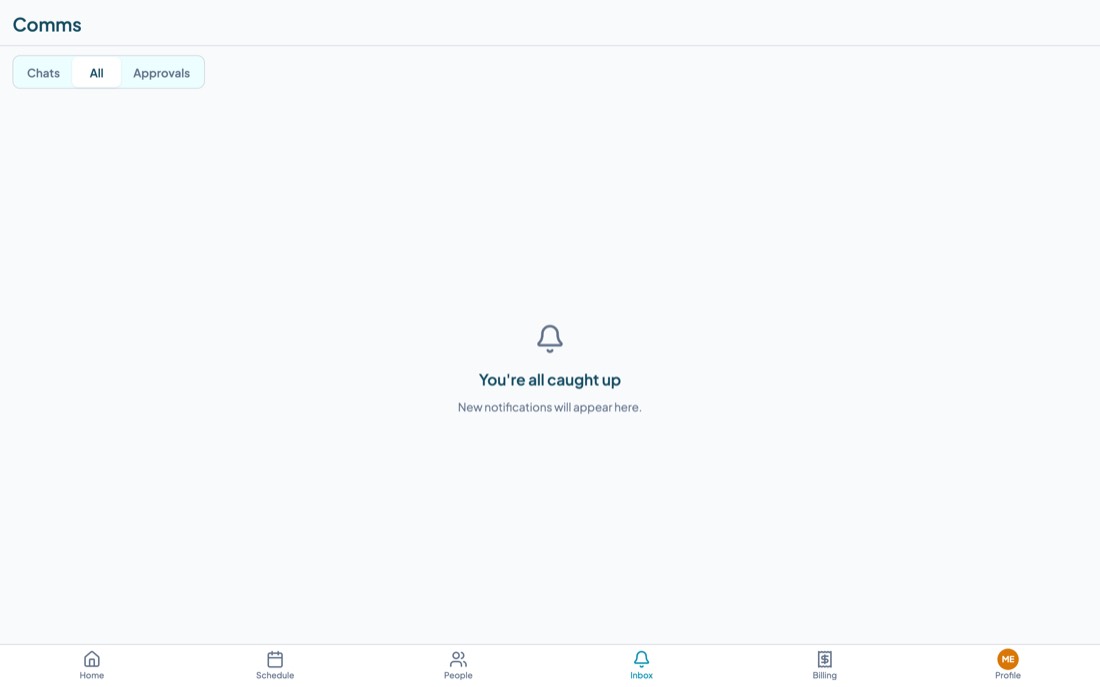
The Inbox tab holds both, plus approvals. Tabs across the top split it into Chats, All and Approvals.
A18. Leave and travel
Leave
Carers request leave from the app. Requests arrive for approval, and approved leave appears on the board so you can see, while you are rostering, that someone is away. Leave requests have their own list, so you can see what is pending and what has been approved.
Travel approvals
Where carers log kilometres, the office approves them. The travel approvals screen filters by Pending or All, and by This week or This pay period, and totals the trips and kilometres so you can approve a batch rather than one at a time.
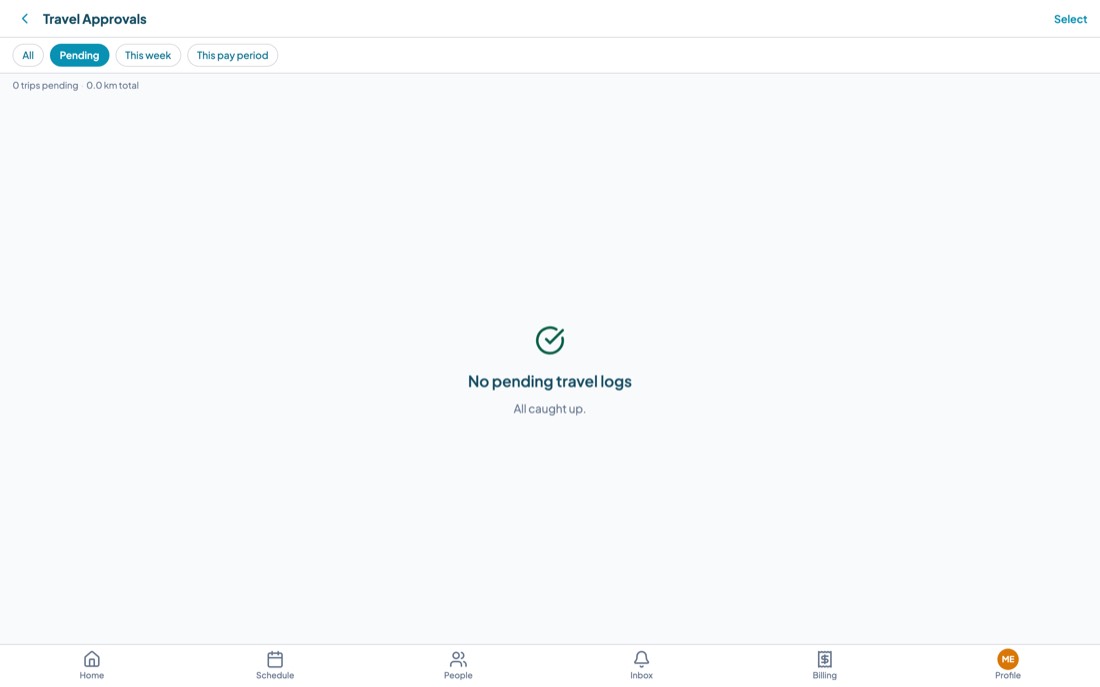
Travel distance needs a home address on the worker's record. If Home is telling you "N workers missing home address", that is why. Fix it once and the calculations start working.
A19. Billing
Billing in Teiro is a run, not a button. You gather the delivered services for a period, check the lines, produce the outputs for whoever is paying, and then reconcile what actually came in.
The billing hub
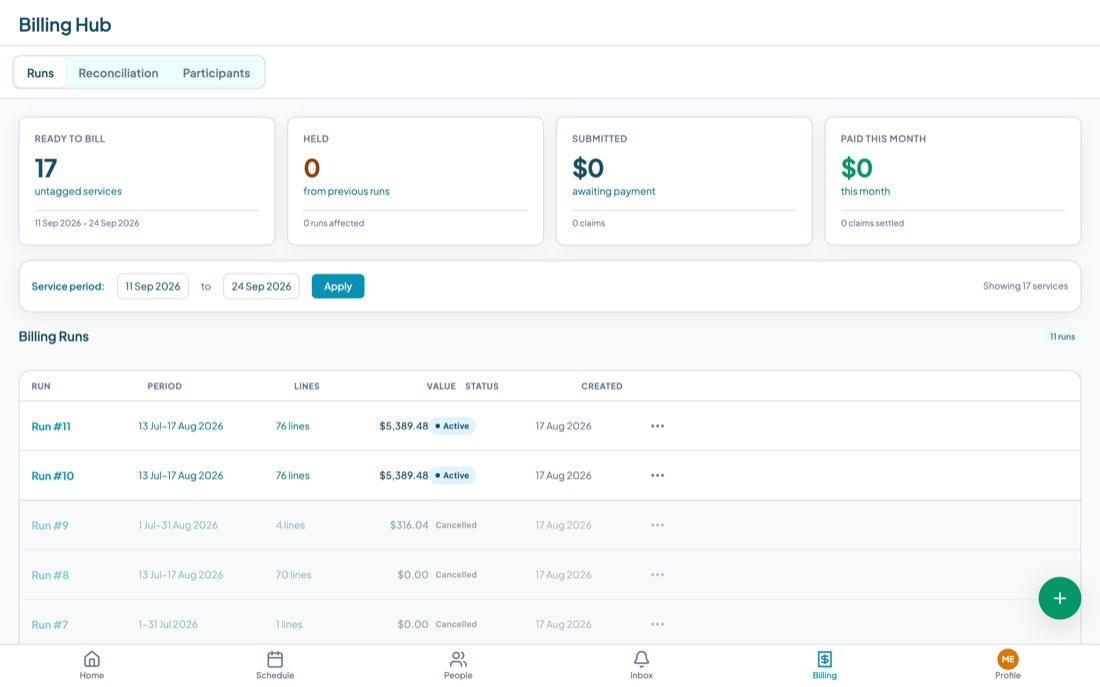
Four tiles tell you where you stand: Ready to Bill for the current period, Held from previous runs, Submitted and awaiting payment, and Paid this month. Below them, every run you have ever done, with its period, line count, value and status.
Creating a run
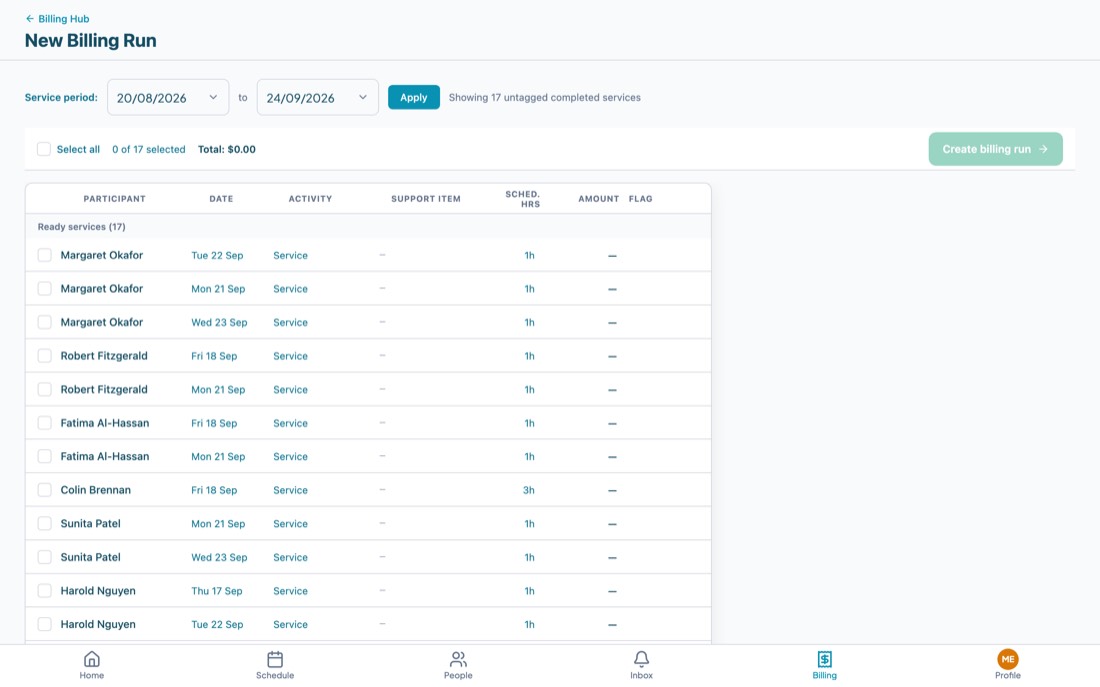
- Set the service period and tap Apply. Teiro shows you the completed services in that period that are not already on a run.
- Review the list, then Select all or tick the ones you want.
- Tap Create billing run.
Working a run
A run has three stages, shown as tabs, and you move through them in order.
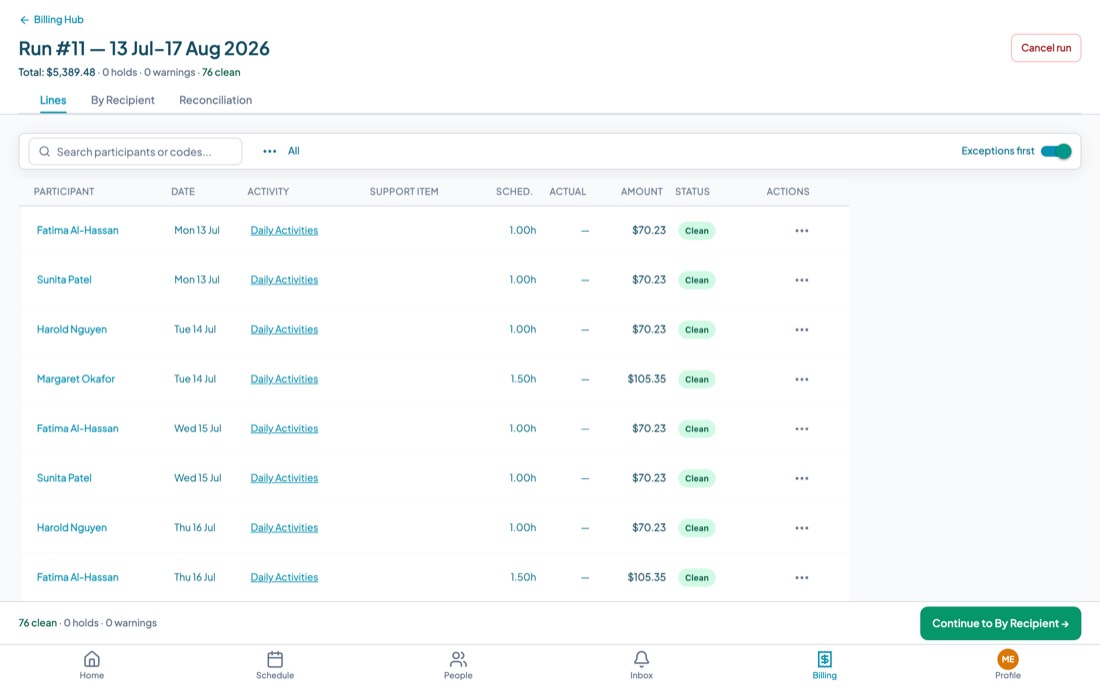
- Lines. Every billable line, with its status. The counters at the top break the run into holds, warnings and clean. Sort by Exceptions first and work the problems, then continue.
- By Recipient. The same lines grouped by who is being billed: the agency portal, a plan manager, or the client themselves. Each group is an output you draft, review and send.
- Reconciliation. After you have sent, this is where payments are matched back. Import payment report for a file from the payer, or Match payment manually for one off payments. Claims are tracked as submitted, paid, rejected or held.
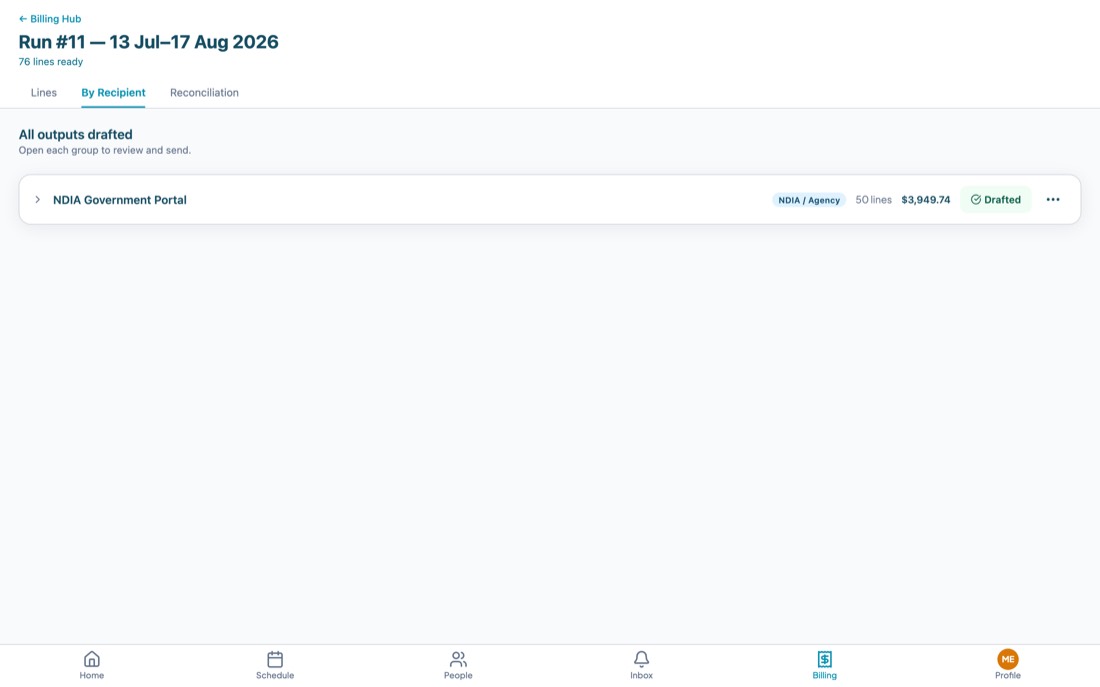
Participants
The Participants tab of the hub is the per client view of billing: what each person has had delivered and what has been claimed for them. Use it when a client or a plan manager queries an invoice.
A service with no support item on it will show a zero amount. That usually means the service was booked without an agreement, or the category does not map to a support item in the agreement. Fix it on the service or the agreement rather than on the billing line, so the next visit comes through correctly too.
A20. Reports
Reports live behind the Profile menu, under Reports. They are grouped into operations, finance and compliance, and every one of them exports to CSV.
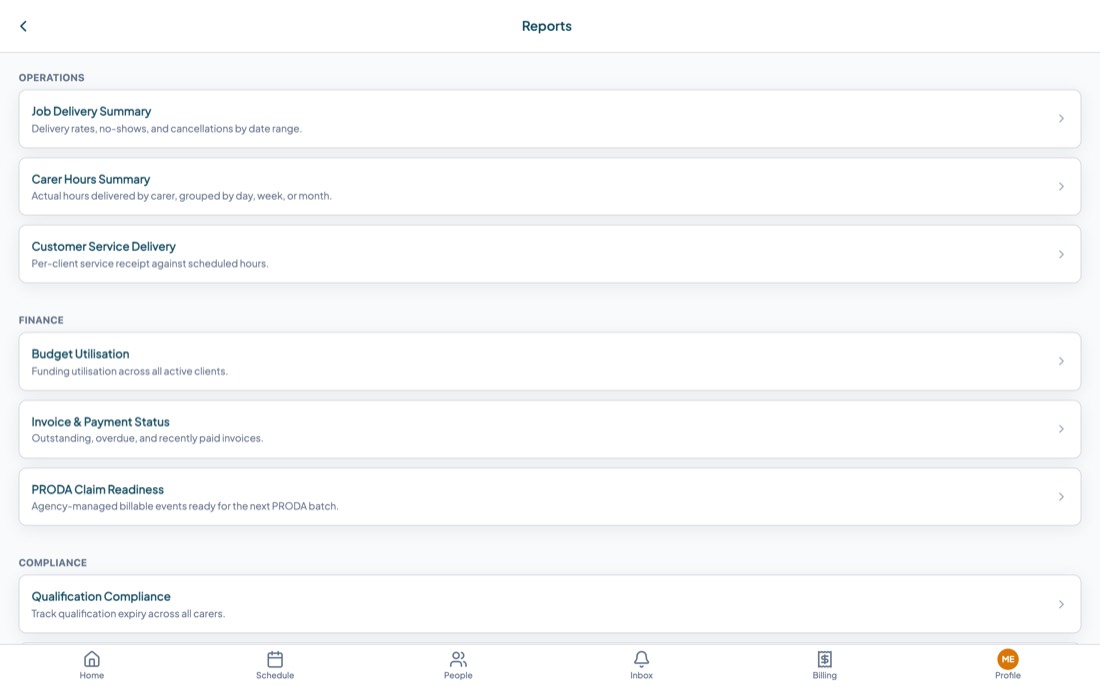
| Report | Answers |
|---|---|
| Job Delivery Summary | Delivery rates, no shows and cancellations over a date range. |
| Carer Hours Summary | Hours actually delivered per carer, by day, week or month. |
| Customer Service Delivery | What each client received against what was scheduled. |
| Budget Utilisation | Funding used across all active clients. |
| Invoice & Payment Status | What is outstanding, overdue and recently paid. |
| PRODA Claim Readiness | Agency managed billable events ready for the next batch. |
| Qualification Compliance | Which carers have expired, expiring or missing qualifications. |
| Incident Register | Every incident by date, severity and status. |
| Complaints Register | Every complaint by date, status and what it concerns. |
| Services without a note | Completed visits with no written record. |
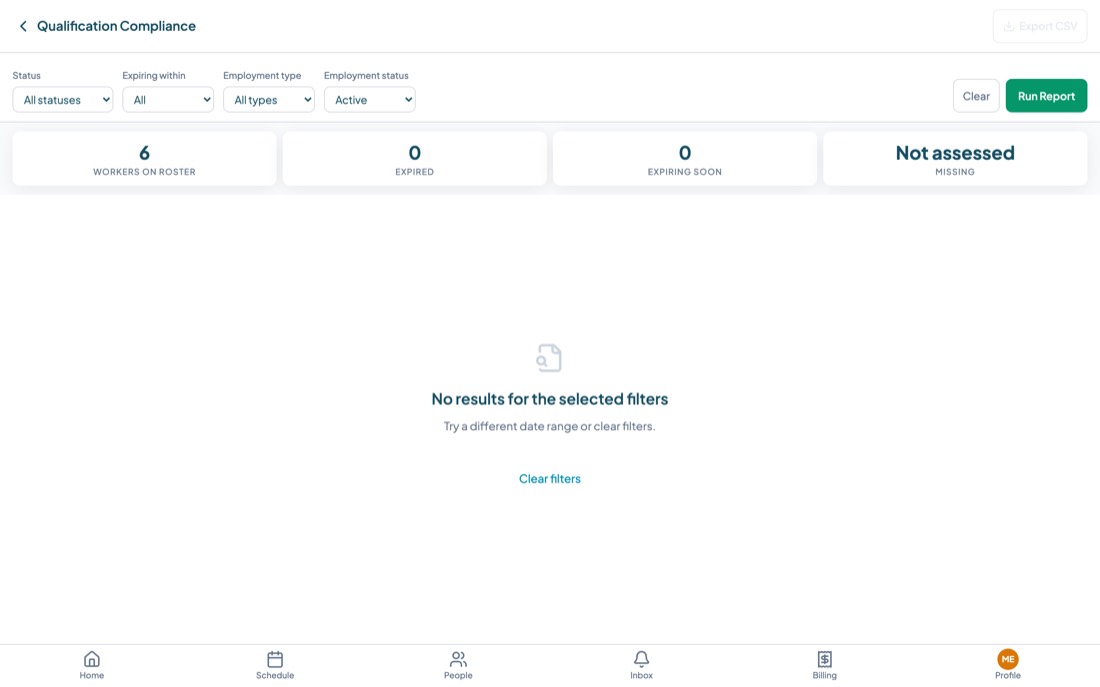
Each report works the same way: set the filters, tap Run Report, read the summary tiles, then Export CSV if you need it out of the app.
Job Delivery Summary, Carer Hours Summary, Customer Service Delivery and PRODA Claim Readiness currently return no rows, regardless of your filters. They look for services under a record type that was retired when services were consolidated, so they no longer find them. This is a known defect, not a filter you have set wrongly. Until it is fixed, use the Billing Hub for delivered work and claim readiness, and a client's Schedule tab for what an individual received.
Part B · The carer app
For support workers, on a phone.
This is the part to hand to your field staff. It is short on purpose. A carer needs six things: see the shift, get in, do the work, record it, get out, and tell someone if something went wrong.
- Written for a phone
- Keeps working without signal
- Sections B1 to B12
Check ins and notes are held on your phone and sent as soon as you have signal again. A note is never thrown away: if it cannot be sent, it comes back as a draft with your words still in it, and you post it again. Keep working.
B1. Getting in
Install Teiro from the App Store or Google Play, or open it in your phone's browser. Sign in with the email your organisation invited, using Google, Microsoft or Apple if that is the account your work email uses, or with a password.
You only sign in once. The app keeps you signed in.
When your phone asks, say yes. Notifications are how you find out about a shift change, a message from the office, or a shift going spare that you might want.
B2. Your day
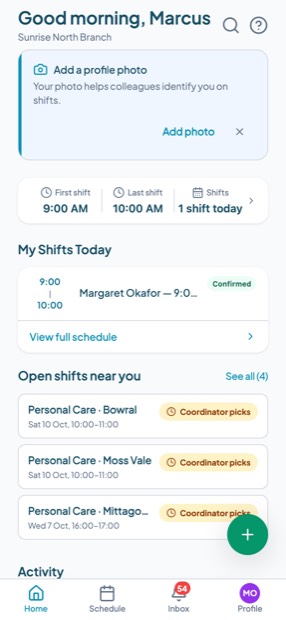
Home tells you, from the top:
- First shift, last shift, how many today. The shape of your day in one line.
- My Shifts Today. Each shift with its time, the client and its status. Tap one to open it.
- Open shifts near you. Extra work going spare. See B10.
- Activity. Anything waiting on you, such as a visit you finished without completing the checklist.
The Schedule tab at the bottom shows your whole roster rather than just today.
B3. Opening a shift
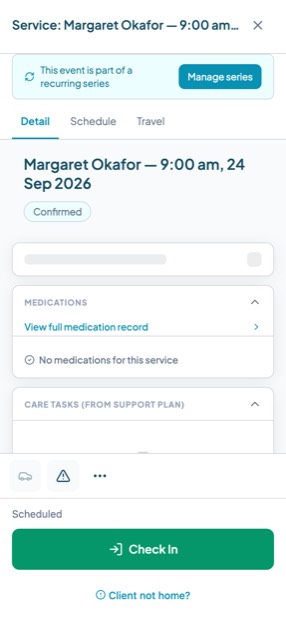
Tap a shift and it opens as a card with everything you need for that visit.
From the top:
- Pre shift briefing. What you need to know before you knock: access instructions, anything the office has flagged.
- Medications. What is due this visit, if anything. Covered in B6.
- Care tasks. The tasks on this client's support plan. If it says no support plan on file, there is nothing set for you and you work to your usual instructions.
- The details. Time, client, category, address.
- Notes. Including the note from the previous visit, so you start knowing what happened last time.
- The buttons at the bottom. Check In, and Client not home?.
B4. Checking in
When you arrive, open the shift and tap Check In.
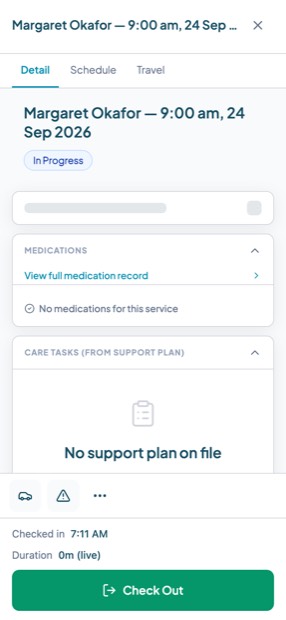
Three things happen. An ON SHIFT banner appears at the top of every screen with a live timer, so you always know you are on the clock. The shift moves to In Progress. And the time and place of your check in are recorded on the visit.
Your location is used at check in to confirm you are where the visit is. If you are somewhere unexpected, that is recorded too, and the office sees it as an attendance exception rather than a silent problem.
Some providers turn check in and check out off. If yours has, you will see a single Visit completed action instead of a check in and a check out. Everything else in this part works the same way.
B5. During the visit
Care tasks
If the client has a support plan, its tasks are listed on the shift. Tick them off as you go.
Writing a note
Tap Add a note... at the bottom of the shift. The composer knows which visit you are on, so you do not have to say.
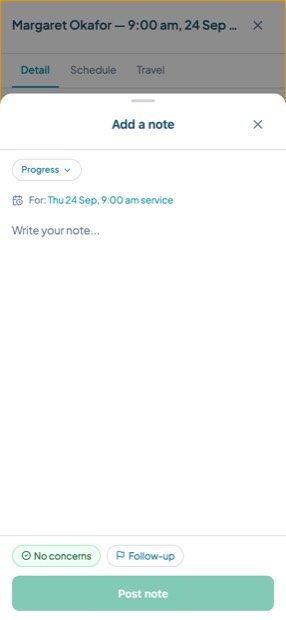
- Choose the type of note. Progress is the everyday one.
- For: confirms which visit the note belongs to.
- No concerns is the quick path for a visit where nothing needs saying.
- Follow up flags the note for the office. Use it when you need someone to do something.
- Post note saves it to the client's record.
You can attach a photo to a note, which is how you record a wound, a hazard or a piece of equipment. The photo is stored against the note on the client's record, where the office can see it.
If you get interrupted, an unfinished note is saved as a draft and offered back to you on your Home screen. It is not lost.
Reporting an incident
If something goes wrong, raise it from the visit you are on, using the incident button on the shift. Reporting from the visit means the client, the time and the shift are filled in for you, and the office sees it immediately. Write what happened and what you did about it. The office does the review afterwards.
B6. Medications
If the client has medications due on your visit, they are on the shift card, with a counter such as 0 of 4 done.
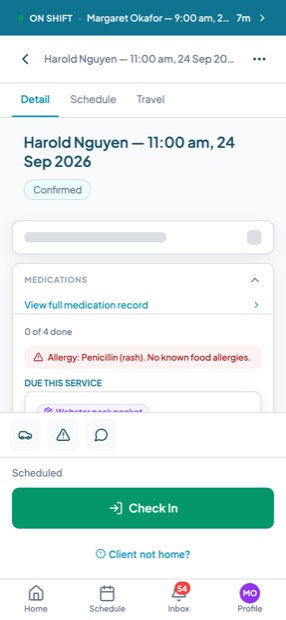
The section is split into:
- Due this service. What is due now. A Webster pack pocket covers several medications at once and is signed as a pocket.
- PRN, as needed. Medications given only if needed, each showing whether it has been given today and what it is for.
- Other medications for this client. The rest of the chart, for reference.
The client's allergies are shown as a banner above the list. Read it.
Recording what you gave
- Tap each medication you are giving. Selected ones are counted at the bottom of the screen.
- Tap Administer.
- Record the outcome, and sign.
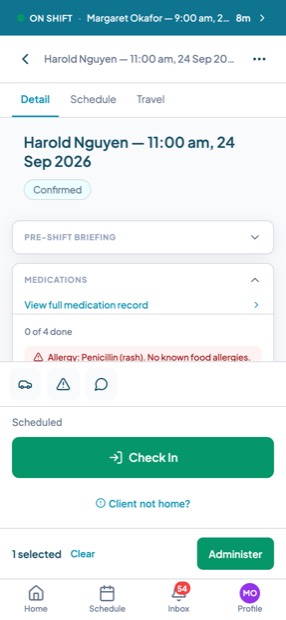
A medication marked Controlled drug, signature required asks for a signature every time, and may require a witness. This is deliberate. Do not work around it.
Everything you record appears on the client's monthly chart in the office, marked as given, refused, missed, withheld, self administered, absent, not supplied or overdue.
B7. If nobody answers
Do not stand there texting the office. Tap Client not home? on the shift.
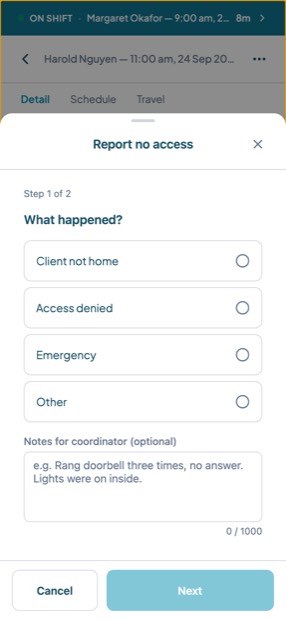
- Say what happened: Client not home, Access denied, Emergency, or Other.
- Add a note for the coordinator if there is anything they need to know.
- Tap Next and follow the second step.
This raises an alert to the office straight away, and records the attempt on the visit, which matters both for the client's safety and for whether the visit can be claimed.
B8. Finishing the visit
Tap Check Out. Teiro asks how you want to finish.
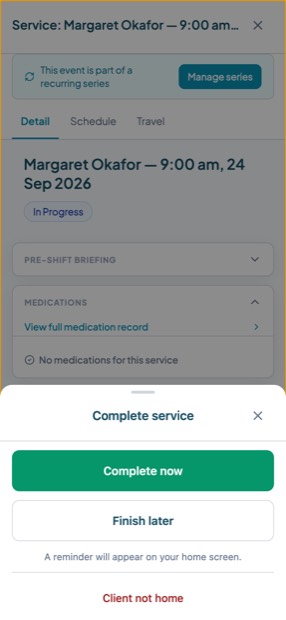
- Complete now takes you straight into the short checklist that closes the visit off.
- Finish later checks you out but leaves the paperwork. A reminder appears on your Home screen so it does not get forgotten.
The verification checklist
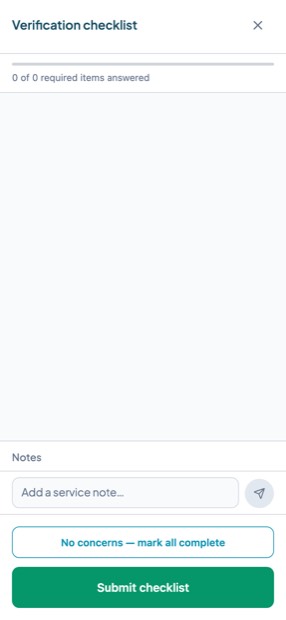
The checklist is the last step. It confirms the visit happened as booked. Answer the required items, add notes if there is anything to say, then Submit checklist. If nothing needs flagging, No concerns, mark all complete does it in one tap.
What is on your checklist depends on your organisation. If nothing has been configured, you will only see the notes field and the one tap option.
The checklist is what releases the visit for billing. An unfinished checklist is not just paperwork: it holds up your organisation getting paid for work you have already done.
B9. Travel
Each shift has a Travel tab where you log kilometres for that visit. Logged travel goes to the office for approval, and totals up over the pay period.
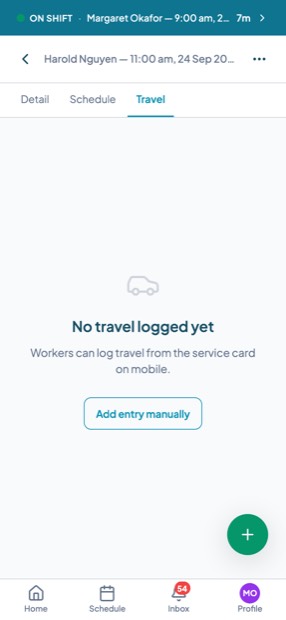
Teiro needs your home address on your worker record to work out distances. If yours is missing, ask the office to add it once.
B10. Picking up extra shifts
When the office cannot fill a shift, they offer it to the team. Offers appear on your Home screen under Open shifts near you, and all of them together under Open shifts.
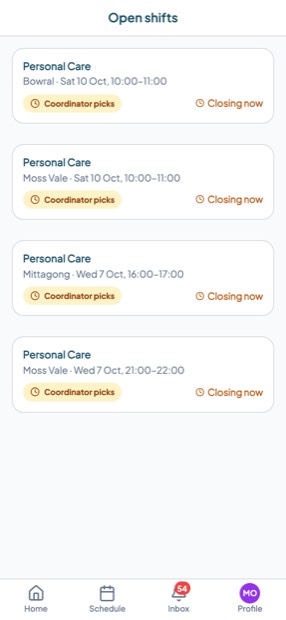
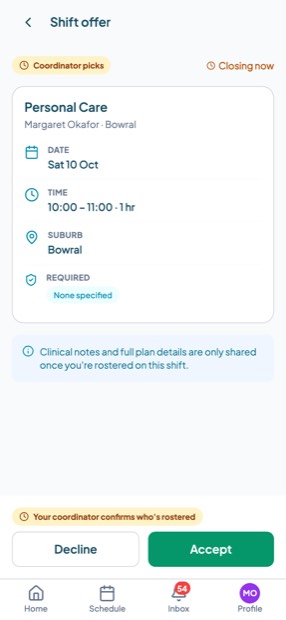
Each offer shows the date, time, suburb and anything the shift requires. A badge tells you how it will be decided: Coordinator picks means the office chooses from everyone who responds, otherwise the first person to accept gets it. Closing now means it is about to expire.
You will not see the client's clinical notes or full plan on an offer. Those are shared once you are actually rostered on.
B11. Messages
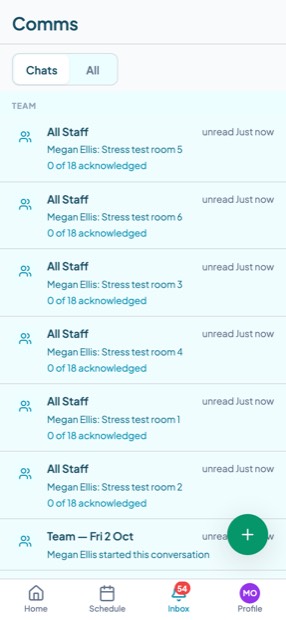
Your Inbox holds two things:
- Team, announcements from the office. Some ask you to acknowledge them, and the office can see who has.
- Client messages, conversations about a visit you are on or have just done. These open when you are assigned and close afterwards, so you will not have an open ended chat thread with a client.
B12. Handbooks
Handbooks, from your Profile menu, is where your organisation publishes policies, procedures and reference material. If it is empty, nothing has been published yet.
Your Profile menu also holds My Details, My Permissions (what your role lets you do), App preferences, a link to this User Guide, and Sign Out.
Part C · Administration
For owners and administrators.
The settings in this part are set once, early, and then rarely touched. Getting them right at the start saves a great deal of correcting later.
- Requires an admin role
- Sections C1 to C10
C1. Organisation settings
Open the Profile menu at the bottom right, then Org Settings. Everything in this part lives on that screen or one tap from it.
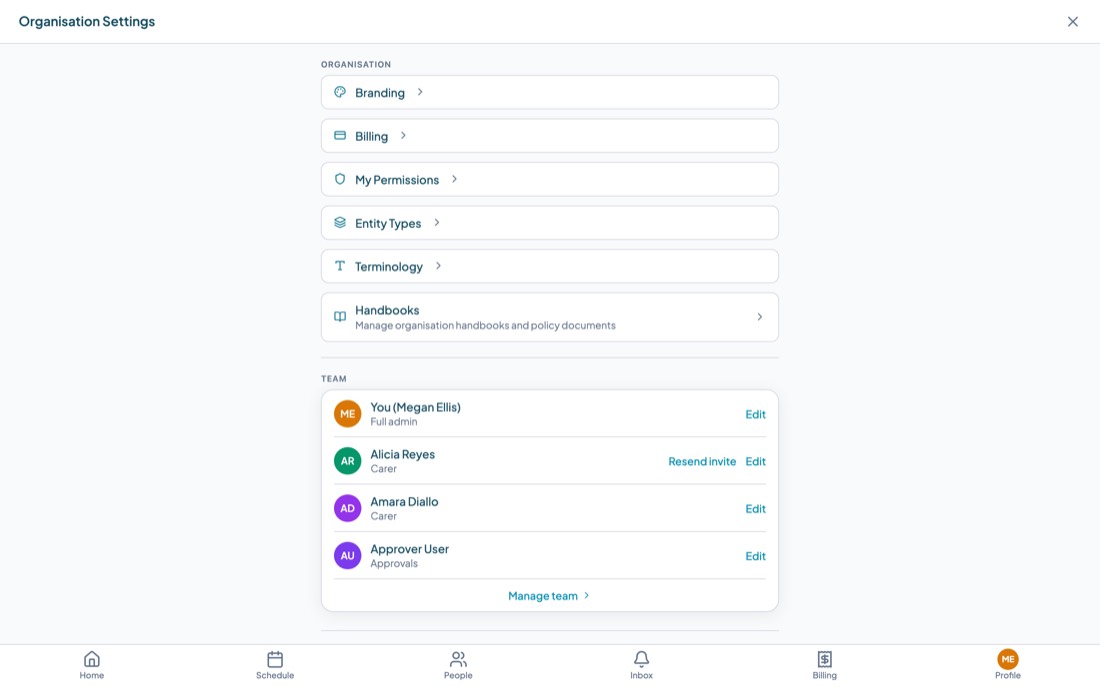
The screen has two halves. At the top, links out to Branding, Billing, My Permissions, Entity Types, Terminology and Handbooks. Below, your team and the settings that change how the app behaves for everybody.
C2. Branding
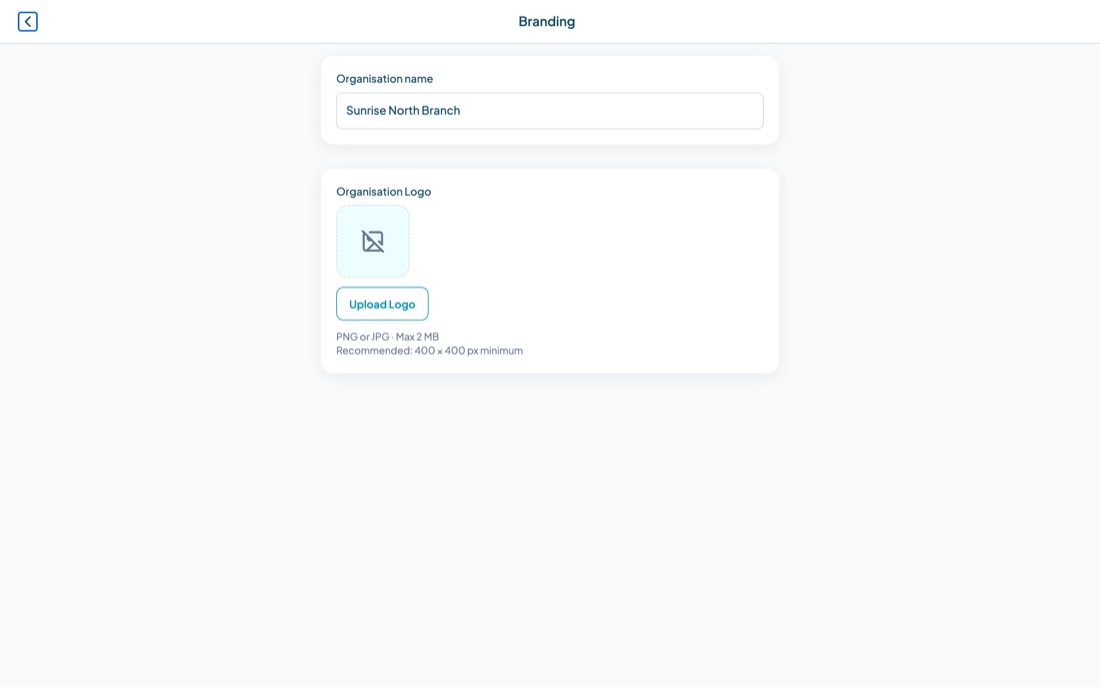
Your logo and organisation name, which appear in the app for your staff. Upload a PNG or JPG. Your name also appears under the greeting on everyone's home screen, so staff who work for more than one provider always know which one they are looking at.
C3. Terminology
Teiro's default words are Customer, Service, Engagement and Assignee. If your organisation says something else, change it here and the whole app follows: menus, buttons, headings and empty states.
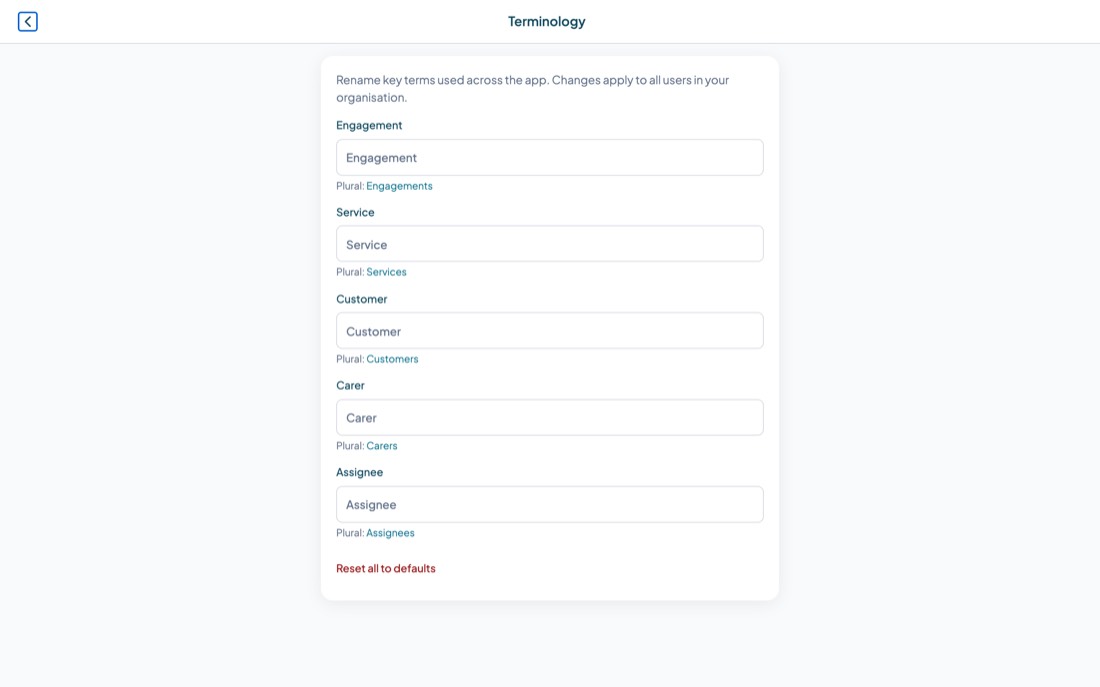
Set both the singular and the plural, because the app uses both. Reset all to defaults puts everything back if you change your mind.
Changing terminology after your team has learned the app is a small but real source of confusion. Pick your words in the first week.
C4. Roster and visit rules
Three settings on the Organisation Settings screen change how everyone works. They are worth a deliberate decision each.
| Setting | What it does |
|---|---|
| Require approval before publishing Roster publishing |
Turn this on and schedulers submit roster changes for review rather than publishing them. Approvers action them from the Approvals tab. Turn it off in a small team where the person building the roster is the person responsible for it. |
| Day starts at Scheduler |
Where the board's timeline begins. The default is 6:00 AM. Set it to match your earliest regular visit so you are not scrolling past empty hours all day. |
| Require check in and check out Visits |
On by default. When off, carers tap a single Visit completed action instead of checking in and out, and no arrival or departure times are captured. |
Check in and check out are what produce arrival times, attendance exceptions and the actual hours a visit took. Without them you lose the evidence that a visit happened when it was meant to, and you lose the difference between scheduled and actual hours for billing. Turn it off only if you have a deliberate reason, such as facility based work where carers are on site all day anyway.
C5. Complaints timeframes
Set how many business days you allow yourself to acknowledge a complaint. Weekends and public holidays are skipped, and 0 means acknowledge immediately. You can set a shorter timeframe for complaints flagged as an allegation against a worker's conduct.
Choose your public holiday region so the business day calculation uses the right calendar. You can pick a state or National only.
Neither the NDIS nor the aged care framework prescribes a fixed acknowledgement deadline. This setting is how you hold yourself to your own complaints policy, and how Teiro tells you when you are about to miss it.
C6. People and access
Inviting someone
- Profile menu, then Invite Staff.
- Enter their name and the email address they will sign in with.
- Pick a role.
- Send invite. They receive an email with a link.
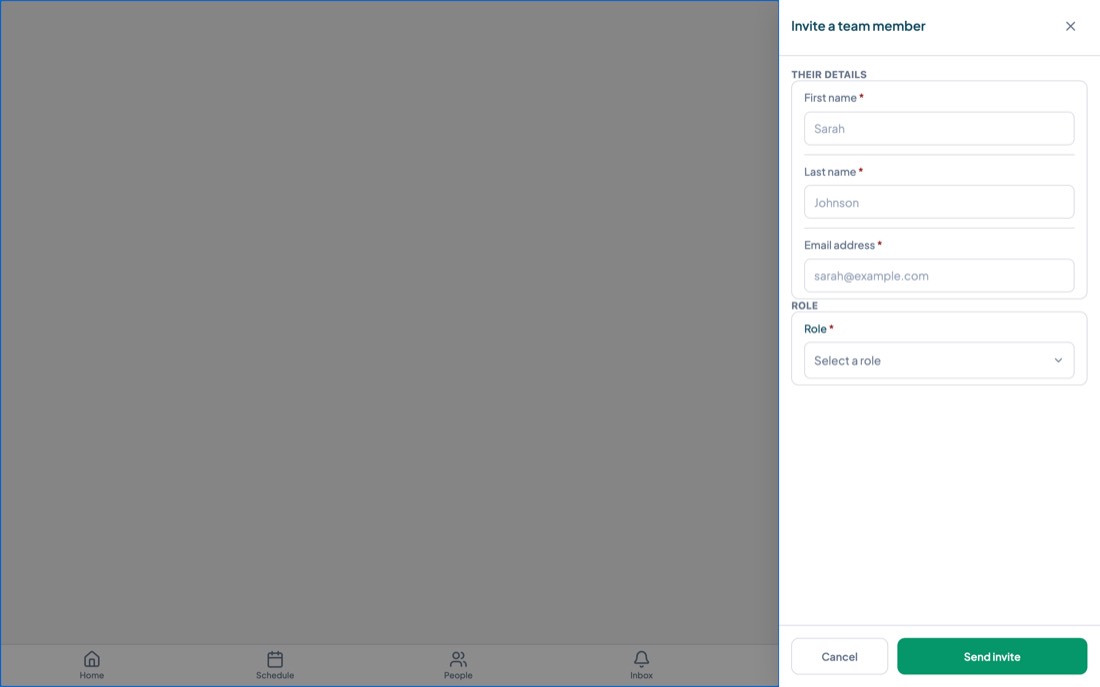
Until they accept, they show as Invited and you can Resend invite from the team list.
Managing the team
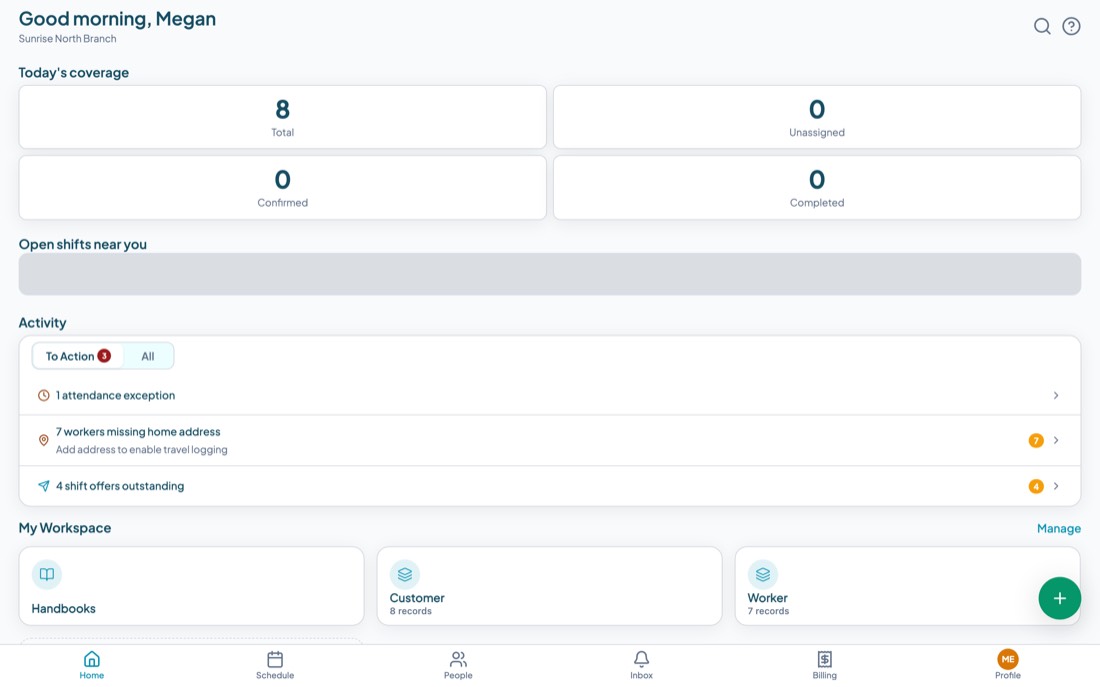
The team list shows everyone, their role, and whether they have signed in yet. Edit changes a person's role, which changes what they can see immediately.
Roles
There are four roles to choose from when you invite or edit someone.
| Role | Gets |
|---|---|
| Carer | Their own assigned shifts, basic client information for those clients, check in, and their own availability. No roster wide view, no billing, and no access to clients they do not visit. |
| Scheduler | The scheduling board, client records, managing services, and visibility of the whole team. |
| Approver | The approvals queue, client records, standing instructions and reports. This is the role that actions roster publishing when you have that switched on. |
| Admin | Everything: the admin panel, user management, organisation settings, full billing and all reports. |
People can hold more than one role, and that is normal in a small provider: an owner who also does visits holds Admin and Carer. Anyone can check what their own role allows under My Permissions.
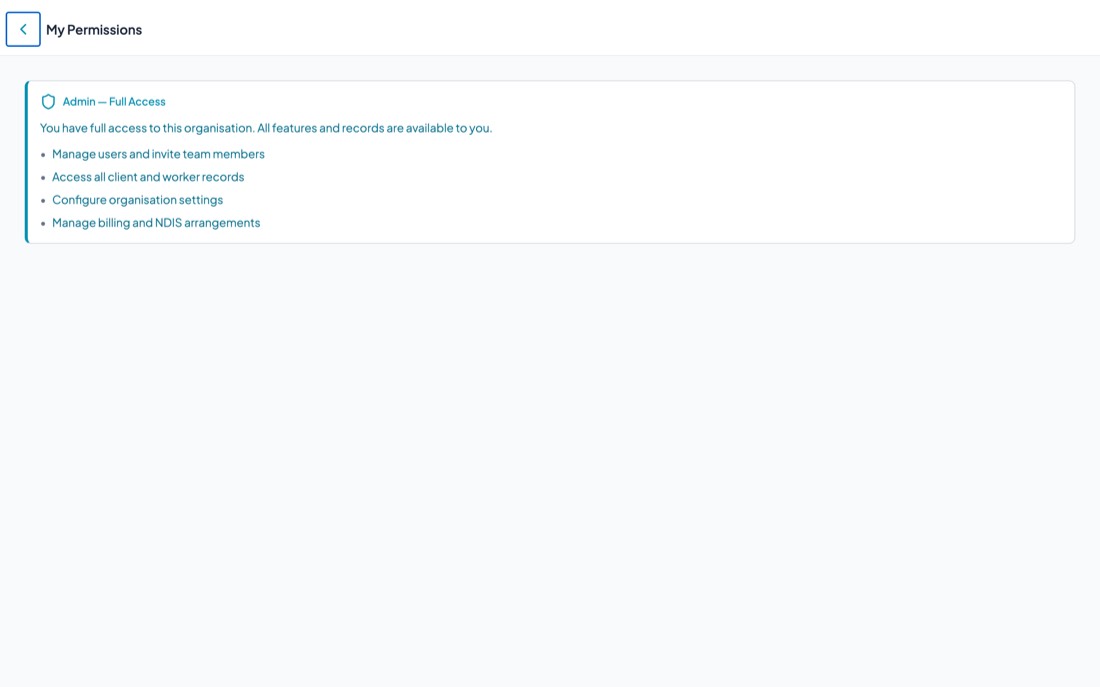
C7. Record types and forms
Almost everything in Teiro is a record of some type: clients, workers, services, notes, incidents, leave requests, competencies, and around fifty more. Entity Types is where you see them and add your own.
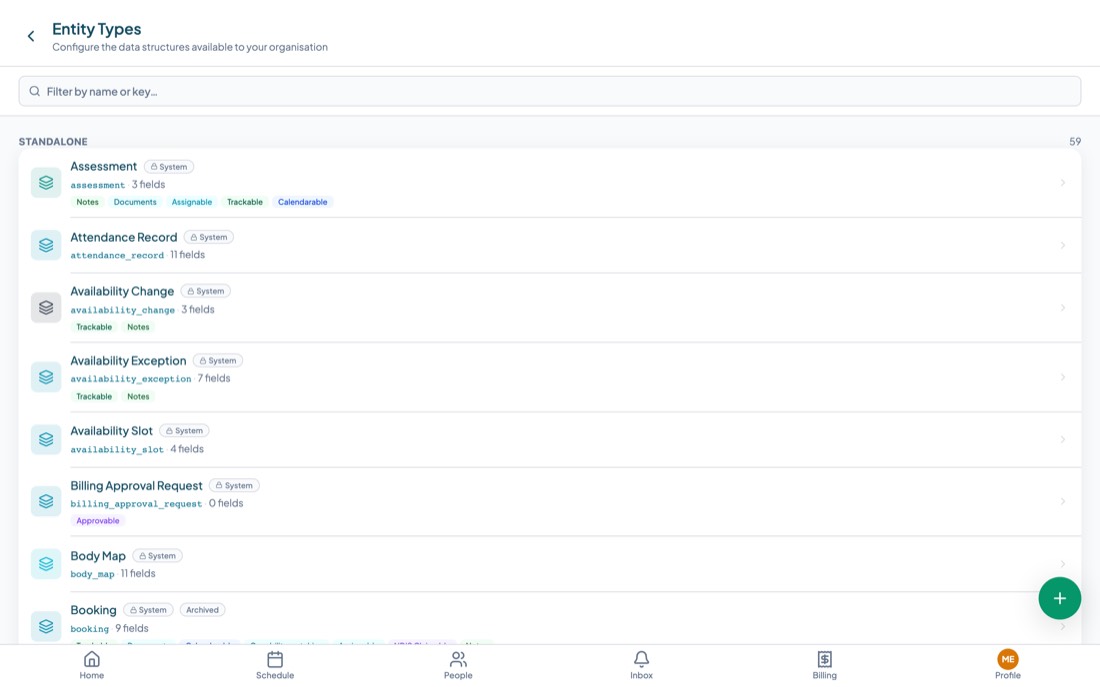
Each type lists how many fields it has and which capabilities it carries. The capabilities are what make a record type behave a certain way:
| Calendarable | Appears on the schedule board and can be rostered. |
| Assignable | Can be given to a worker. |
| Notes | People can write notes against it. |
| Documents | Files can be attached to it. |
| Approvable | Goes through an approval queue. |
| Billable and NDIS claimable | Can carry a rate and reach a billing run or a claim. |
| Trackable | Has a status that moves through a lifecycle. |
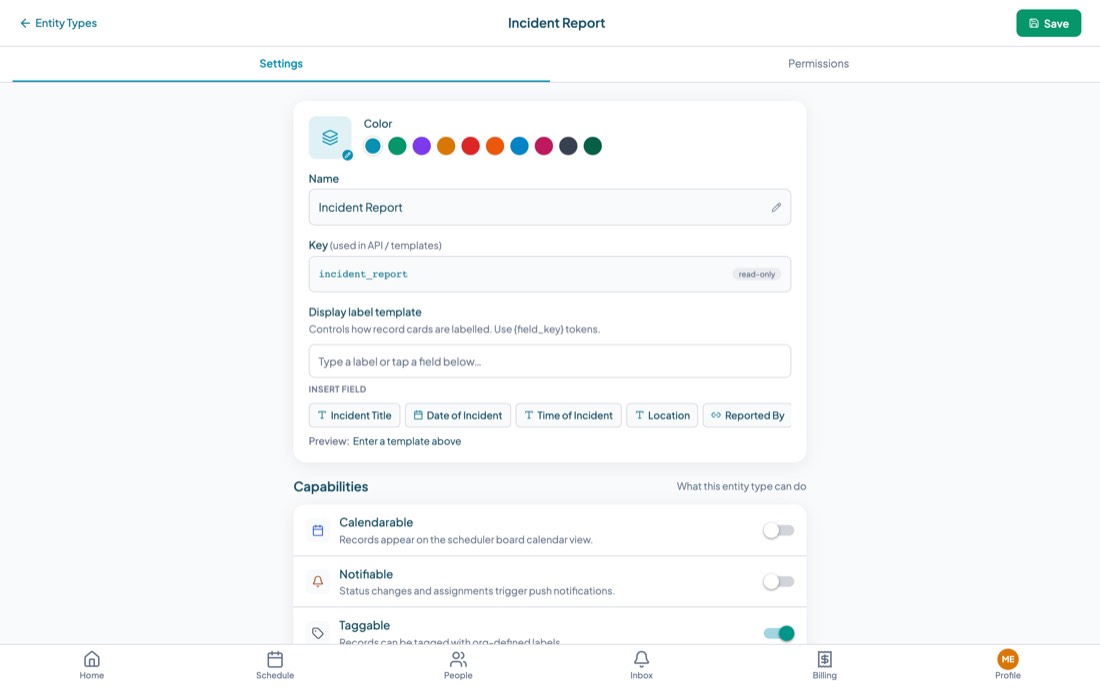
You can create your own type when your organisation records something Teiro does not have out of the box, add fields to it, and give it the capabilities it needs. A new type appears in browse and can be pinned to anyone's workspace.
Removing a field removes it from every existing record of that type, and making a field required affects records already saved without it. Add rather than remove where you can, and change types before you have thousands of records rather than after.
C8. Billing setup
Billing from Organisation Settings holds the details that appear on what you send out, and the rules for claiming.
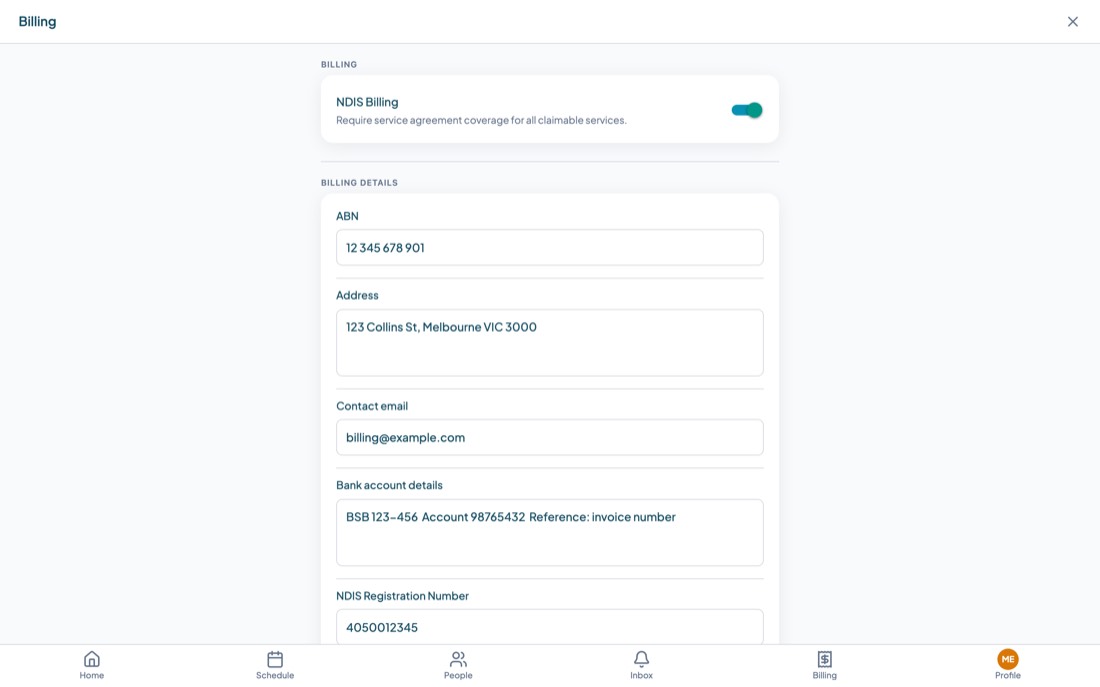
- Require service agreement coverage for all claimable services. With this on, a service cannot be claimed unless it sits under an agreement that covers it. It is the single most effective way to stop unclaimable work.
- Billing details: ABN, address, contact email, bank account, and your invoice payment terms in days. These appear on invoices.
- NDIS registration number and provider name, used on claim outputs.
C9. The audit log
Every change to every record, with who made it, when, and how many fields changed. Filter by date range, event type and record type, and export what you filtered.
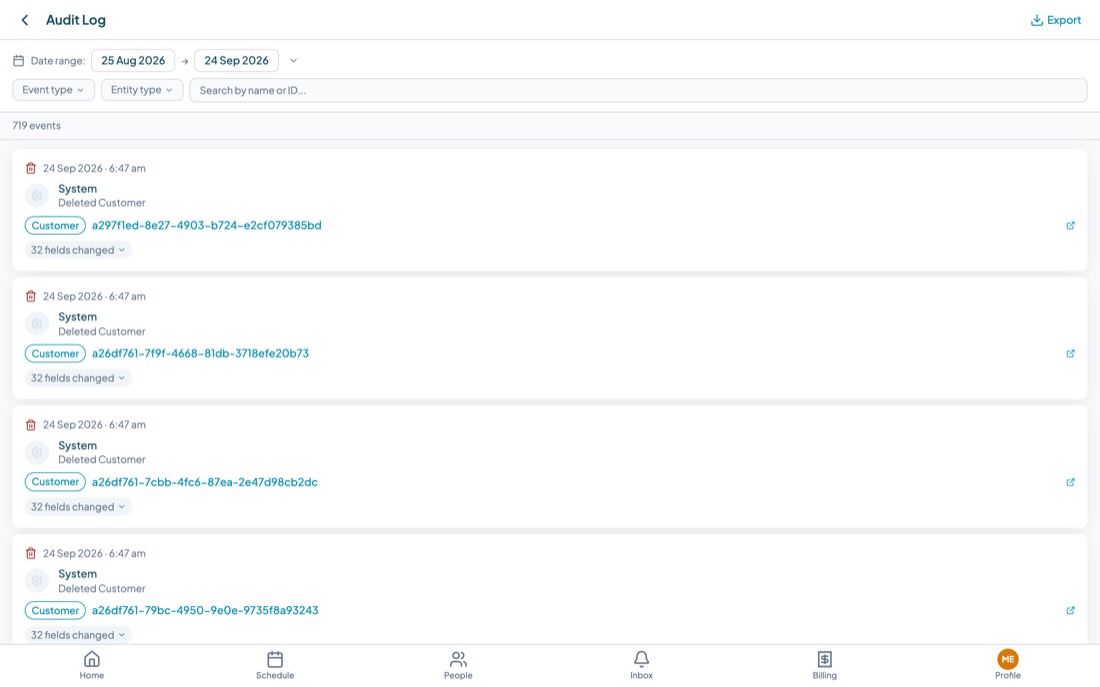
Use it for exactly two things: answering an audit, and settling a disagreement about what a record used to say.
C10. Product tours
New users get a short guided walkthrough the first time they open a screen. App preferences, from the Profile menu, controls it: Show product tours turns the walkthroughs off for people who do not want them, and Replay product tours brings them back, which is useful when you are training someone.
Appendix
Reference, and a few honest notes.
Service statuses
A service moves through these as the day happens. The colour of a block on the board follows the status.
| Status | Means |
|---|---|
| Scheduled | Booked. Not yet confirmed with anyone. |
| Confirmed | Booked and settled. This is the normal state of tomorrow's roster. |
| In Progress | A carer has checked in and is there now. |
| No Access | The carer attended and could not get in. A reason is recorded. |
| Pending Verification | The visit happened; the closing checklist has not been submitted. This is the queue that holds up billing. |
| Completed | Delivered and closed off. |
| Verified | Checked after the fact and released for billing. |
| Claimed | On a billing run that has been submitted. |
| Rejected | Claimed and knocked back by the payer. Fix and resubmit. |
| Cancelled | Called off. A cancellation reason is recorded, which matters for whether it can still be charged. |
Who sees what
| Carer | Scheduler | Approver | Admin | |
|---|---|---|---|---|
| Their own shifts | Yes | Yes | Yes | Yes |
| The whole roster | No | Yes | Yes | Yes |
| All client files | Assigned only | Yes | Yes | Yes |
| Write notes and incidents | Yes | Yes | Yes | Yes |
| Assign and offer shifts | No | Yes | Yes | Yes |
| Approvals queue | No | No | Yes | Yes |
| Billing runs and claims | No | No | No | Yes |
| Organisation settings and users | No | No | No | Yes |
Worth knowing
A short, honest list of things that will otherwise waste your time.
- Four reports return no rows. Job Delivery Summary, Carer Hours Summary, Customer Service Delivery and PRODA Claim Readiness look for services under a record type that has been retired, so they find nothing whatever you filter. Use the Billing Hub and the client Schedule tab instead until this is fixed.
- Leave shows on the board without a label. Approved leave appears as a block on the carer's lane, but the block reads "Unnamed" rather than naming the leave. The lane and the dates are right; only the label is missing.
- The verification checklist is empty until someone configures it. Out of the box the closing checklist has no required items, so carers see only a notes field and a one tap complete. That is fine, but it is not a checklist until you set one up.
- Handbooks start empty. Nothing is published until an administrator uploads it, and carers see an empty state until then.
- Client messaging depends on setup. Day of contact threads exist in the app as soon as a carer is assigned. Whether a message also reaches the client's phone by SMS depends on your organisation's messaging configuration.
- Services booked without an agreement bill at zero. They will still appear on a billing run, with no support item and no amount. Set the agreement on the service, or on the client, rather than patching the billing line.
Getting help
- The question mark at the top right of most screens explains that screen.
- Chat with Support, in the Profile menu, reaches Teiro.
- Your administrator is the right first stop for anything about access, roles, or settings, because most "I cannot see X" questions are a role rather than a fault.
- The version number on the sign in screen is worth quoting when you report a problem.
Teiro User Guide, version 1.4.8. Screenshots were taken from the running application, so what you see here is what the app does.